NM Single Action Cylinder Line

Hondo44

Hawkeye
Joined
Apr 3, 2009
Messages
8,642
City & State/Province
People's Republik of California
There's been many thread discussions about mitigating the cylinder line on revolvers. The cylinder line is a given, it's part of the design, I get that and don't worry about it. But as part of my action tune up on any revolver I obtain, I've always polished the cylinder stop on my revolvers. It can make a big difference in cylinder wear, especially since some cylinder stops these days can be coarse, some even showing file marks when new.

However, on my most recent new model acquisitions which are new guns, even after polishing the stops, I can't help noticing the cylinder line is advancing rapidly beyond other New Models that I've had and shot for years.

Today I figured out why. I removed the cylinders of several of my new models, the new guns (all post 2005), and older (all before about1980) New Models. I closed the loading gate and pushed down on the cylinder stop. The new guns have very noticeably stiffer stop springs! I'll be removing springs and compare pre 1980 with post 2005 springs. And probably ordering a bunch of older springs if they have different part numbers. If they have the same part number I'll be clipping the stiffer springs. I don't quick draw with my single actions and don't anticipate any negative affects.

Anyone else notice the stiffer springs?
 
Last edited:
That is good information to know but you are working on the symptom, not the disease.
The infamous "Ruger ring" is caused by the cylinder latch rising way too early, which in turn is caused by the hammer's plunger releasing it too soon.....In other words, for some reason known only to Ruger, the NM action was purposely designed to be out of time. There's fixes for that, one of which used to be posted around here someplace. I never kept up with the drawings and instructions myself because I don't mess with the NM Single actions....But I'd bet a dollar that some of the other old-timers around here still have the info in a file somewhere. Maybe someone who does will see this thread and post it.

DGW
 
Yessir, it's a battle between 2 springs. The hammer plunger gives way to the "latch" spring. You can work on either or both springs and come to a compromise that will allow "drop" to happen in the approach and maintain reliable ignition depending on main spring tension. I have to do the same thing setting up ROA's whether with cap cyls or conversion cyls.

Mike
 
That is good information to know but you are working on the symptom, not the disease.
The infamous "Ruger ring" is caused by the cylinder latch rising way too early, which in turn is caused by the hammer's plunger releasing it too soon.....In other words, for some reason known only to Ruger, the NM action was purposely designed to be out of time. There's fixes for that, one of which used to be posted around here someplace. I never kept up with the drawings and instructions myself because I don't mess with the NM Single actions....But I'd bet a dollar that some of the other old-timers around here still have the info in a file somewhere. Maybe someone who does will see this thread and post it.

DGW
The cyl ring is common to every revolver ever made, not just Ruger. But you're correct about the Ruger, its timing of when the cyl stop latch is released to snap up against the cyl is a problem, although not unique to Ruger. I'm familiar with plunger modification, etc., listed below. And there's another factor involved. Even with the cyl latch timing correction, unless one is meticulous about positioning the cyl notch approach ramp over the cylinder latch when closing the loading gate (or de-cocking the hammer on an old model) or closing the cylinder on a double action every single time, the ring will still get etched on the cylinder. And the very heavy latch spring tension I recently noticed on later New Models magnifies the damage.

And even if the cyl latch timing snaps up into the approach ramp to the cyl notch, the excessive latch pressure accelerates the rounding of the front edge of the cyl notch (the lower side of the notch). Reducing the spring tension is also part of the disease and the easier part to treat than the following process.

Thank you DGW for your reference to the following:
Here's a compilation writeup about preventing the “cylinder stop latch track"

Check the plunger in the hammer for freedom of up and down movement and oil it well. It could have a roughly drilled hole from a dull drill bit. Also the bottom of the hole may have drill shavings in it. I've seen that too.

The Ruger design allows the latch to rise way too early, but it's on purpose for a positive cyl locking under rapid shooting conditions.
The cure is to extend the hammer plunger's travel to increase the 'dwell' time of the latch and delay its rise until it rises into the cyl notch lead.

TWO METHODS DEPENDING ON ORIGINAL FACTORY PLUNGER CONFIGURATION (they can vary slightly):

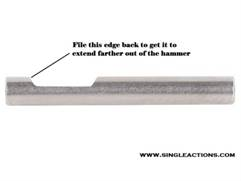
1. Factory plunger is long enough. An extended hammer plunger travel creates a more gradual engagement and transition over the tip of the rear cyl latch leg as well as holding the cyl latch down longer instead of popping up early and scribing a long line around the cyl. In a perfectly tuned action (not a Ruger New Model) the cyl latch doesn't pop up until the cyl notch approach cut is over the latch and doesn't mark the cyl surface. To delay the cyl latch from popping up too early, Lee Martin suggests this on the hammer plunger:

To quote member, "Lee Martin": The hammer plunger protrudes from the hammer itself. It looks like this below, and actuates the cyl latch drop and rise. To delay the rise of the latch movement the plunger must be extended. Filing the back edge of the notch will usually accomplish just that.

http://i192.photobucket.com/albums/z149/AtomicPinUp/RugerHammerPlunger_zpsd225ebb0.jpg[/img]
1770585219636.png


2. Factory plunger not long enough. “The base of a #42 drill bit is the easiest way to get the exact size rod and proper steel for the NM pin.

OMs seldom need this modification, but the OM pin size is larger, a 1/8” drill bit.”
Also a 3/32 (.0938) drill bit shank works good to make a replacement.
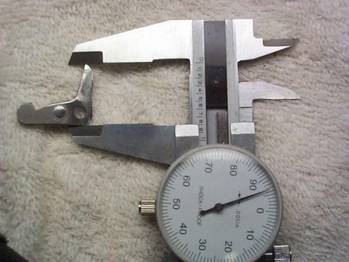
The cyl bolts can vary slightly so you may have to shorten the ‘C’ dimension a little at a time until it works to your liking.
http://i127.photobucket.com/albums/p148/h84738/latch20timming.jpg[/img]

View attachment 94786
1770586770479.png

You’ll notice the cyl bolt is a stamped part and is very rough on the edge that the hammer plunger contacts. Polishing this edge will smooth up plunger and bolt function.
Bolt mod method of welding:
http://pic50.picturetrail.com/VOL437/657373/10211423/128518571.jpg[/img]
1770586878442.png
 
Last edited:
Every revolver made? The turn line should not be present on any Colt-type action, new or old, original or replica. Including the Old Model Blackhawk and Single Six.

The problem with the New Model is even if you adjust the timing so that the bolt drops into the leede, you would have to be care to never close the loading gate unless the bolt was under the notch. Same for DA's. Some are timed right but will still put a line on the cylinder from closing it and rotating it to lock. Newer S&W's will have two distinct lines. A thin line from closing the cylinder and rotating it, a broad line from the bolt dragging, usually starting about halfway between chambers.
 
The cyl ring is common to every revolver ever made, not just Ruger. But you're correct about the Ruger, its timing of when the cyl stop latch is released to snap up against the cyl is a problem, although not unique to Ruger. I'm familiar with plunger modification, etc., listed below. And there's another factor involved. Even with the cyl latch timing correction, unless one is meticulous about positioning the cyl notch approach ramp over the cylinder latch when closing the loading gate (or de-cocking the hammer on an old model) or closing the cylinder on a double action every single time, the ring will still get etched on the cylinder. And the very heavy latch spring tension I recently noticed on later New Models magnifies the damage.

And even if the cyl latch timing snaps up into the approach ramp to the cyl notch, the excessive latch pressure accelerates the rounding of the front edge of the cyl notch (the lower side of the notch). Reducing the spring tension is also part of the disease and the easier part to treat than the following process.

Thank you DGW for your reference to the following:
Here's a compilation writeup about preventing the “cylinder stop latch track"

Check the plunger in the hammer for freedom of up and down movement and oil it well. It could have a roughly drilled hole from a dull drill bit. Also the bottom of the hole may have drill shavings in it. I've seen that too.

The Ruger design allows the latch to rise way too early, but it's on purpose for a positive cyl locking under rapid shooting conditions.
The cure is to extend the hammer plunger's travel to increase the 'dwell' time of the latch and delay its rise until it rises into the cyl notch lead.

TWO METHODS DEPENDING ON ORIGINAL FACTORY PLUNGER CONFIGURATION (they can vary slightly):

1. Factory plunger is long enough. An extended hammer plunger travel creates a more gradual engagement and transition over the tip of the rear cyl latch leg as well as holding the cyl latch down longer instead of popping up early and scribing a long line around the cyl. In a perfectly tuned action (not a Ruger New Model) the cyl latch doesn't pop up until the cyl notch approach cut is over the latch and doesn't mark the cyl surface. To delay the cyl latch from popping up too early, Lee Martin suggests this on the hammer plunger:

To quote member, "Lee Martin": The hammer plunger protrudes from the hammer itself. It looks like this below, and actuates the cyl latch drop and rise. To delay the rise of the latch movement the plunger must be extended. Filing the back edge of the notch will usually accomplish just that.

http://i192.photobucket.com/albums/z149/AtomicPinUp/RugerHammerPlunger_zpsd225ebb0.jpg[/img]
View attachment 94785

2. Factory plunger not long enough. “The base of a #42 drill bit is the easiest way to get the exact size rod and proper steel for the NM pin.

OMs seldom need this modification, but the OM pin size is larger, a 1/8” drill bit.”
Also a 3/32 (.0938) drill bit shank works good to make a replacement.
The cyl bolts can vary slightly so you may have to shorten the ‘C’ dimension a little at a time until it works to your liking.
http://i127.photobucket.com/albums/p148/h84738/latch20timming.jpg[/img]

View attachment 94786
View attachment 94793
You’ll notice the cyl bolt is a stamped part and is very rough on the edge that the hammer plunger contacts. Polishing this edge will smooth up plunger and bolt function.
Bolt mod method of welding:
http://pic50.picturetrail.com/VOL437/657373/10211423/128518571.jpg[/img]
View attachment 94796
This can be a fix if the hammer plunger spring is strong enough to resist the latch spring tension. If not, the difference will only be incremental.
You can reduce latch spring tension which will allow the hammer plunger to stay extended for a longer period . . . dropping the latch later.

As I said, if the main spring is reduced enough, it becomes even more of a "dance" as to how much hammer plunger spring tension can be increased that won't effect reliable ignition.
At the end of the day, the battle between the h.plunger and latch springs denotes "when" the latch drops.

Mike
 
Seems like a lot of work to eliminate a problem that most don't worry about anyway.
"Seems" is the operative word. It's not that hard (if you know what you're doing) to prevent what some folks view as "unsightly". Some don't care if their new car gets a scratch, some do . . .

Mike
 
Blued steel magnifies the appearance of the turn line also. My last new Ruger that I purchased is my blued steel New Model Single-six that was made in 2015. The first thing I admired on this revolver was a much nicer polished blued steel finish that what you would expect on a regular production revolver, but, the dreaded turn line became very noticeable quite quickly. As others have mention the dropping of the locking bolt drops very early in the cocking process. I read articles on my gun forums how you could minimize this turn line showing up. However, I bought my revolver to shoot and enjoy so I just decided to get over my obsessive behavior and accept it as part of the package. Stainless steel makes the turn line much less noticeable and normally I only buy stainless hand guns but this LNIB little Single-six became available at what I thought was a very good price and I'm happy.
 
Maybe someone with machine access would make a bunch of lengthen hammer plungers as mentioned by Hondo44 in post #5, method #2. I make them by hand but somewhat tedious.
 
Maybe someone with machine access would make a bunch of lengthen hammer plungers as mentioned by Hondo44 in post #5, method #2. I make them by hand but somewhat tedious.
Plus, the hole in the hammer where the plunger sits has to be drilled a bit deeper, which itself can be a challenge for some. And after everything is machined, drilled, and fabricated, it all has to be hand fitted to the specific gun so that stuff don't start breaking.....
Not saying that it's all that hard to do, but I am saying that it takes a good bit of patience, skill, and a proper drill bit. Them Ruger hammers are tuff..LOL.

Someone said that the results might not be worth it. I guess that's up to the individual, but I will say this much...No way would I buy a high-end custom NM Ruger only to have it start scratching-up it's cylinder as soon as I put it into service. As a matter of fact, the inevitable, infamous "Ruger ring" is the main reason that I shoot an OM, and don't even own a NM.
...Shame on Ruger. They could have done better.

DGW
 
Plus, the hole in the hammer where the plunger sits has to be drilled a bit deeper, which itself can be a challenge for some. And after everything is machined, drilled, and fabricated, it all has to be hand fitted to the specific gun so that stuff don't start breaking.....
Not saying that it's all that hard to do, but I am saying that it takes a good bit of patience, skill, and a proper drill bit. Them Ruger hammers are tuff..LOL.

Someone said that the results might not be worth it. I guess that's up to the individual, but I will say this much...No way would I buy a high-end custom NM Ruger only to have it start scratching-up it's cylinder as soon as I put it into service. As a matter of fact, the inevitable, infamous "Ruger ring" is the main reason that I shoot an OM, and don't even own a NM.
...Shame on Ruger. They could have done better.

DGW
I have several high end custom Ruger New Models and not in one instance did I have them bother to retime so they don't drag the cylinder. As I said, you're gonna get a line from closing the loading gate and rotating to lock anyway. Colt type actions are a totally different story.
 
I have several high end custom Ruger New Models and not in one instance did I have them bother to retime so they don't drag the cylinder. As I said, you're gonna get a line from closing the loading gate and rotating to lock anyway. Colt type actions are a totally different story.
I have never seen a Colt DA or SA that's been used without a cylinder line. And I've owned several since they were new.
 
I have never seen a Colt DA or SA that's been used without a cylinder line. And I've owned several since they were new.
DA's and SA's are entirely different critters. No Colt single action should have a line unless it's mishandled. Same for Old Model Rugers.
 
The cylinder line always prompts the proverbial "nothing to worry about" vs. "mis-handled" discussion which is fine. But time to get back on track with the specific topic of this thread which is about more aggressive cyl line etching regardless of whether or not it's in the notch approach or cyl surface, relative to a cyl latch spring/plunger tension change in NM Single Actions. It affects the line of course but is a much more limited focus issue.
After checking my New Models I found a difference in spring tension and difference in part #s:

Early new models with Low tension:
.22 Single Sixes 1973 to 1976 vintage use a Latch spring #PR 46 and plunger # PR 18

Later new models with High tension:
.357 BH 1983
.32 Single Six Magnum 1984 -1986 vintage use spring #SSM-46 and Plunger # SSM-77
44 Mag original Vaquero 2004, 44 SPL Flattop 2009, and New Vaquero 44 SPL 2010 spring #XRO4600 AND plunger #XRO7700

Would any readers care to check the part #s if they have the owners manual for any early New Models?
Thx!
 
Last edited:
Back
Top