
You are using an out of date browser. It may not display this or other websites correctly.
You should upgrade or use an alternative browser.
You should upgrade or use an alternative browser.
Fix for pitted Bearcat frame
- Thread starter RockyMT
- Start date


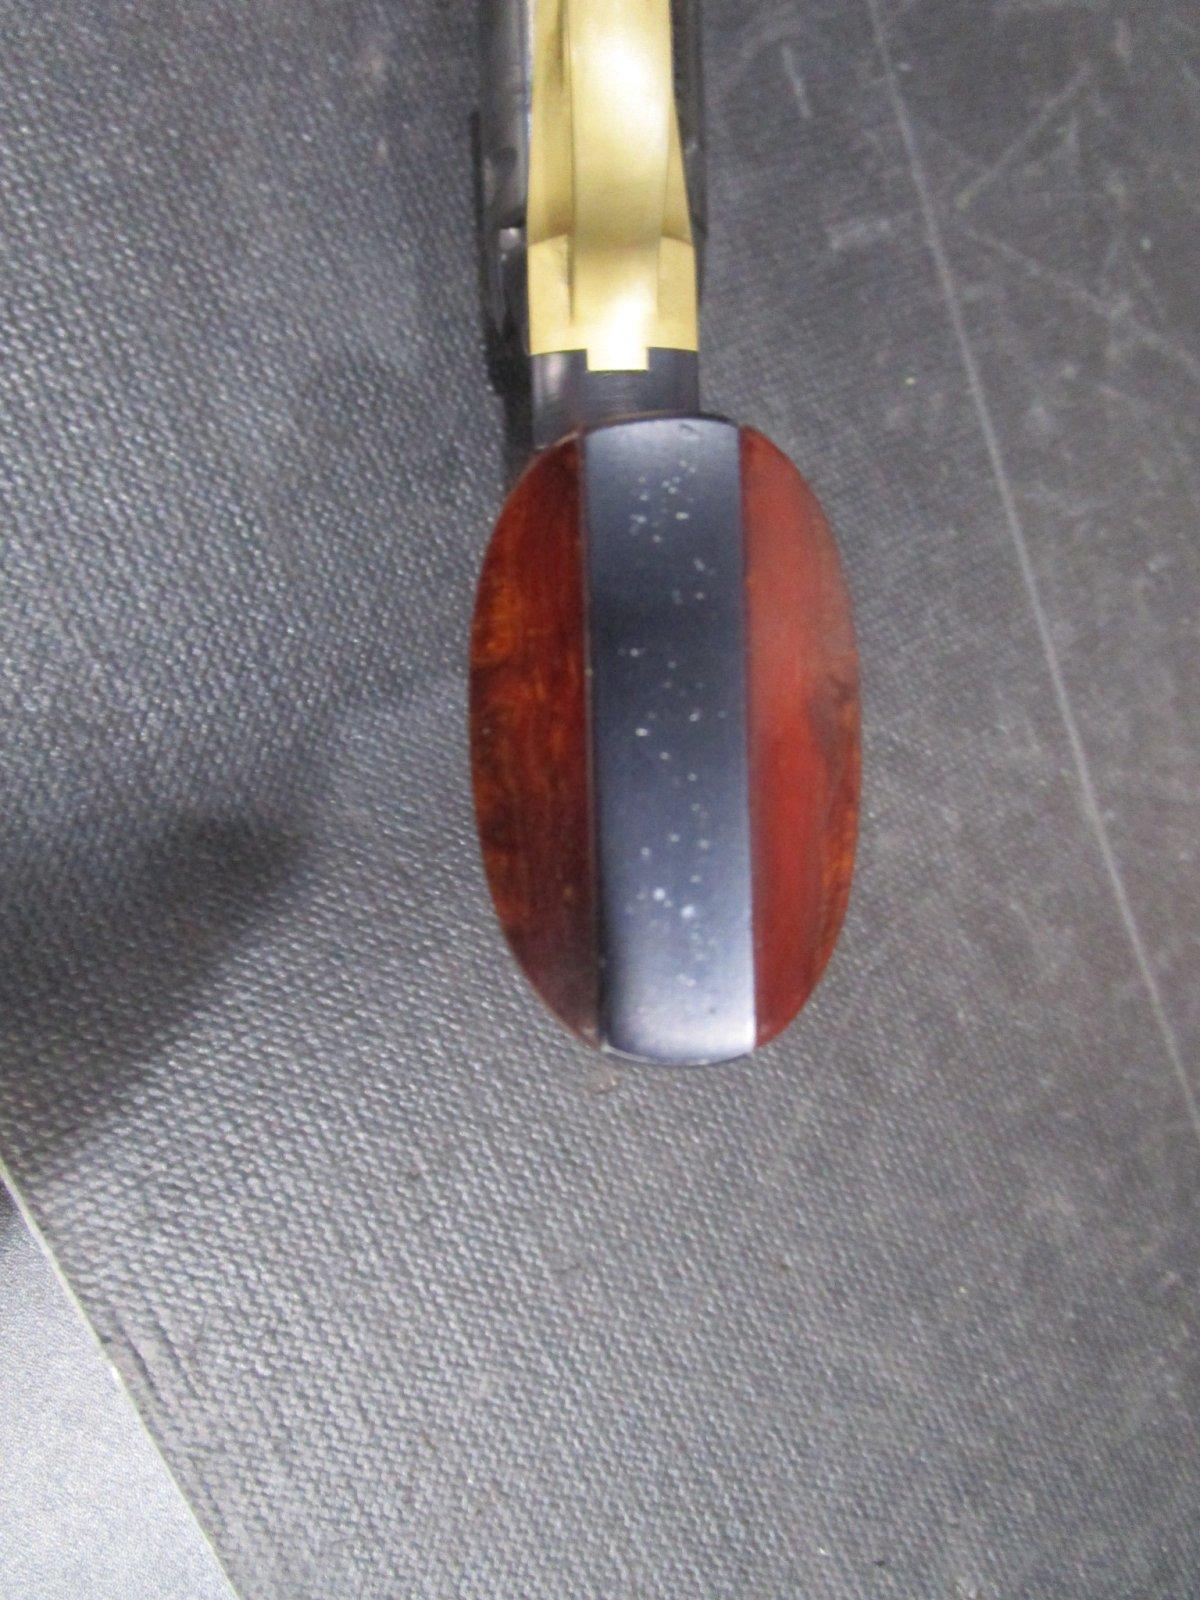
doubt that is pitting, as the frames are an aluminum alloy,,,they get marked and dinged pretty easy..........we used to just polish off the bottom and used Alumahyde from Brownells and give it a quick coat just on the "flat" of the bottom,,,you can tape off the sides etc...but if you give it a quick 'dusting' ( spray by) you can blend it in......nature of the beast of 'aluminum'.........

Never done it on a Bearcat-I understand the stakes are higher…but on standard frames, if the dings aren’t too deep that can be sanded out. If you go this route you may have to sand the bottom of the grip panels to match. Another option is to fill the dings with JB Weld, and then block sand to level. If you sand with finer and finer grades ending up with 600 or finer the blend should be invisible. Then retouch with Alumahyde.
Thanks Randyzzz, I should be able to make that work especially with the help of my Grandson who has been restoring old military items for a few years. This one is for sale and other than these marks its a very nice revolver. So looks like it will be coming home soon as I'm now comfortable with ideas on fixing it.

I doubt anyone would notice that in a nice holster or at the range. It's not a museum piece!





As an Amazon Associate we earn from qualifying purchases. Product prices and availability are accurate as of the date/time indicated and are subject to change.
Very good point @Hvymax. Definitely will be a shooter when I get it home.I doubt anyone would notice that in a nice holster or at the range. It's not a museum piece!

GasGuzzler
Hawkeye
Flat file, Scoth-Brite, and then Alumahyde if it bothers you that much.

Old model or new model? The old is aluminum and the new is steelHi everyone, I'm wondering if there is a fairly simple way to cover or repair the minor pitting on the butt of this Bearcat. Has anyone done it or have any ideas? Thanks

I'm sure almost any attempt to repair will stand out way more than those tiny specks. If it bothers you that much send it to Bolen for a proper going over.
I believe Hvymax is mucho correct....I'm sure almost any attempt to repair will stand out way more than those tiny specks. If it bothers you that much send it to Bolen for a proper going over.
Besides, if you leave it as is, you'll never notice all the new dings you're gonna put on it...

J.
GasGuzzler
Hawkeye
Not so. "Any attempt" is a big blanket statement. This otherwise perfect boxed RSS that was sold new in Dallas had a messed up butt. Fixed it with advice from here, same advice I gave. Steel can be fixed the same way but the Alumahide may not match as well.I'm sure almost any attempt to repair will stand out way more than those tiny specks. If it bothers you that much send it to Bolen for a proper going over.


What I was implying was that matching any finish is challenging. I can "blend" a lot of things with Oxpho blue. That and spray on finishes. You will never match exactly the formula and weather conditions in the factory that given day much less age etc. How many batches on those Bluing Salts, tip on the sprayer etc. I've done a few museum pieces and let me tell you it's no picnic trying to blend a repair.Not so. "Any attempt" is a big blanket statement. This otherwise perfect boxed RSS that was sold new in Dallas had a messed up butt. Fixed it with advice from here, same advice I gave. Steel can be fixed the same way but the Alumahide may not match as well.
GasGuzzler
Hawkeye
You said any attempt to repair would stand out more than the defects. That is not true.
"I'm sure almost any attempt to repair will stand out way more than those tiny specks. If it bothers you that much send it to Bolen for a proper going over."
I believe he said "ALMOST" any attempt....!
Does that help.....?
J.
I believe he said "ALMOST" any attempt....!
Does that help.....?
J.
GasGuzzler
Hawkeye
Not if you put "I'm sure" in front of it."I'm sure almost any attempt to repair will stand out way more than those tiny specks. If it bothers you that much send it to Bolen for a proper going over."
I believe he said "ALMOST" any attempt....!
Does that help.....?
J.
The point I was trying to make is that even a factory repair with the exact same equipment and brand of product at some point years later probably won't be a perfect match. Go talk to a body shop about trying to match a years old factory finish. I figured that if these microscopic " defects " are an issue any deviation in texture and color would be World Ending.
You want a challenge try to match a color case hardened finish. The texture of the charcoal and bone pieces along with other secret ingredients. I love Bolen's work with such things.
keep them separate boys and girls it was about an "alloy" of aluminum, not the 'steel' of either the old model 'Super Bearcat' or the New Bearcats,,,,,and for steel, same thing as noted above , simply file/sand "flat" ( and square) and touch up as needed with any of the cold blues OR if you want to spend the money redo I finish) the entire frame,but I can tell you there is NO ONE I know, that can match the original "anodizing" of the aluminum metal, closest we've seen lately is "Ceracote" and that is what it implies, a "coating" so is "Alumahyde" and even any paint such as 'Krylon' matte or flat black,,we've done and used them all in our shops and they work and a LOT cheaper than sending it out for a "refinish" of the entire gun.......cannot tell you how many we've redone like the one pictured above with the guys "social security number" scratched into the frame .....( how would YOU like your SSN put out there on the internet for the whole world to see)

Last edited:
I had to reweld a few broken frizzens. The process of blending in the original shapes and carvings along with the whole color case and adding "patina" is truly art. I've also rewelded swords and numerous other things. I've done historical copper work a few times.
Old model, aluminum. Vintage 1961Old model or new model? The old is aluminum and the new is steel
....yes, Old Model Super Bearcats are also "steel", the ones with the #91 prefix.......
So- going back to your initial pictures. The damage appears to be shy of each end/corner. When you clean that area up try and leave the original finish on the corners. I’d block sand to remove the dings if they’re not too deep. Or fill with JB and sand. Then blend ( with 600 or finer grit ) in the bare aluminum to the black portion you left at the ends. I like to finish with a grey Scotch Brite pad- I use that same pad to dull shiny grips. Now tape off the sides, and the front and back straps, but leave the tape not fully adhered right up to the corners. Spray multiple light coats instead of heavy ones. I’ll bet you can make it invisible. The key is keeping any color variation at the corner and make it a soft transition instead of a hard line.
GasGuzzler
Hawkeye
^^^
Yes, the best way to tape it is by back-masking. Turn the tape back on itself to leave a rounded edge. That will keep it from having a heavy tape line.
Yes, the best way to tape it is by back-masking. Turn the tape back on itself to leave a rounded edge. That will keep it from having a heavy tape line.
gundog5
Single-Sixer
You are better off engraving your drivers license number on items. If your property is lost or stolen and law enforcement recovers it, it is very difficult for most police agencies to identify you via your social security number. Drivers license info is readily available.
Hondo44
Hawkeye
I know that “I’m sure” does not change the meaning of “almost”."I'm sure almost any attempt to repair will stand out way more than those tiny specks. If it bothers you that much send it to Bolen for a proper going over."
I believe he said "ALMOST" any attempt....!
Does that help.....?
J.
I agree, a large area to fix a small blemish will stand out more if the gun will be used which he said it will be. The spray finish will wear off quickly and look worse than not doing anything.
The blemishes stand out because they shine. A better option for such small blemishes is not to sand and remove all the finish on the butt. Just clean the surface with acetone and spray with alumahyde. Wipe the butt with a very thin cloth wrapped tightly around a smooth surface like a ruler. This leaves the spray only covering the bright spots. Another option is touching up the bright spots with black Sharpie felt tip pen or a gun finish touch up pen found on-line or local gun shop. Then use the wiper. The less cover up finish you use, the less there is to wear off.
Exactly. Those look like pores left from the anodizing process. It's not a Brand New Korth or anything.I know that “I’m sure” does not change the meaning of “almost”.
I agree, a large area to fix a small blemish will stand out more if the gun will be used which he said it will be. The spray finish will wear off quickly and look worse than not doing anything.
The blemishes stand out because they shine. A better option for such small blemishes is not to sand and remove all the finish on the butt. Just clean the surface with acetone and spray with alumahyde. Wipe the butt with a very thin cloth wrapped tightly around a smooth surface like a ruler. This leaves the spray only covering the bright spots. Another option is touching up the bright spots with black Sharpie felt tip pen or a gun finish touch up pen found on-line or local gun shop. Then use the wiper. The less cover up finish you use, the less there is to wear off.
Last edited:
Similar threads


- Replies
- 13
- Views
- 257


- Replies
- 22
- Views
- 601


