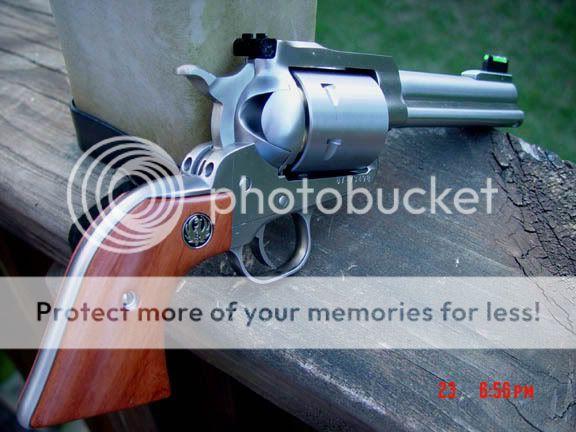
Since Montado Vaqueros were limited production, the hammers are hard to find. Try Ruger 1st. They were holding onto their inventory off and on so just keep trying. I too like the Hunter grip frame especially on my Super Blackhawk but also this large frame 45 Vaquero:
Some helpful videos for the new model:
Video: Good New Model Ruger disassembly:
http://www.youtube.com/watch?v=UfOXBa8K8Ow
NM Reassembly (shows hammer plunger assembly too):
http://www.youtube.com/watch?v=3zEKDqwkgEs&feature=related
Swapping grip frames and hammers are my specialties.
1. Interchangeability of grip frames:
In general, All Ruger SA grip frames including SBH Dragoon, Old Army, Bisley and Birdshead (excluding Bearcats of course) will interchange from the standpoint of the screw pattern from Single Six to Super BH, Old Model to New Model, and even NM to OM.
All the screws, springs and pins can be transferred over from existing GF. The exception is you need the two hex head capscrews for installing a Bisley GF.
Depending on model and vintage, be aware of;
matching the grip frame 'ears'* to main frame,
a simple modification is required for NMs with free spin pawl/cylinder alignment**,
and internal locks ***,
grip frame projections ****.
NM trigger return spring on old model guns*****.
*The 'ear' details to be aware of: Below are photos of the ears around the base of the hammer The height varies on all grip frame ears slightly but there was one specific big increase. To simplify production in about 1997, Ruger increased the height of the standard cylinder frame mating surfaces on both sides of the hammer 1/16" to match the Bisley model frame ears so any style grip frame could be assembled to any main frame. Therefore the ears on all other grip frame after 1997 had to be made 1/16" taller as well. So there's basically two sizes: as short as .530" pre 1997 and as tall as .590" after 1997; measured from the very top edge of the grip panel to the top of the ears. That's why swaps are simplified if any acquired grip frame matches the vintage of your Ruger that you want to put it on. For example: Original Vaqueros over serial range 56-XXXXX.
The grip frame 'ears':
EARS & Hammer Base sizes: Also, Ruger has only enlarged the base of the hammer to match the ears on the new style hammers such as the New Vaq standard 'long horn' and Montado hammers, and the NM Flat Top Blackhawk hammers. All other existing hammers on current model guns do not match well.
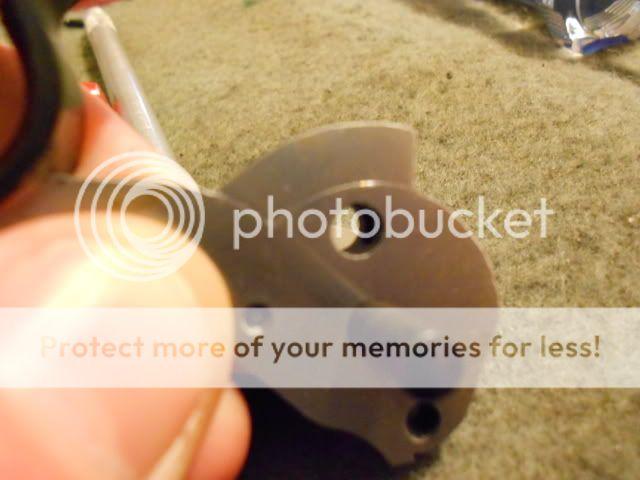
**"Indexing Pawl System" All the NM FT Blackhawks and NEW Vaqs have this system which allows the cyl to roll backwards enough for the chambers to align to the loading gate chute without the hammer on half cock (which can't be done on a new model). You can see the device (3 parts) in the hammer channel to the lower left of the cyl pin hole shown below. Grip frames from models w/o this system need a divot cut for the free spin cyl pawl.
Hex retaining screw in hammer channel:
Indexing pawl button:
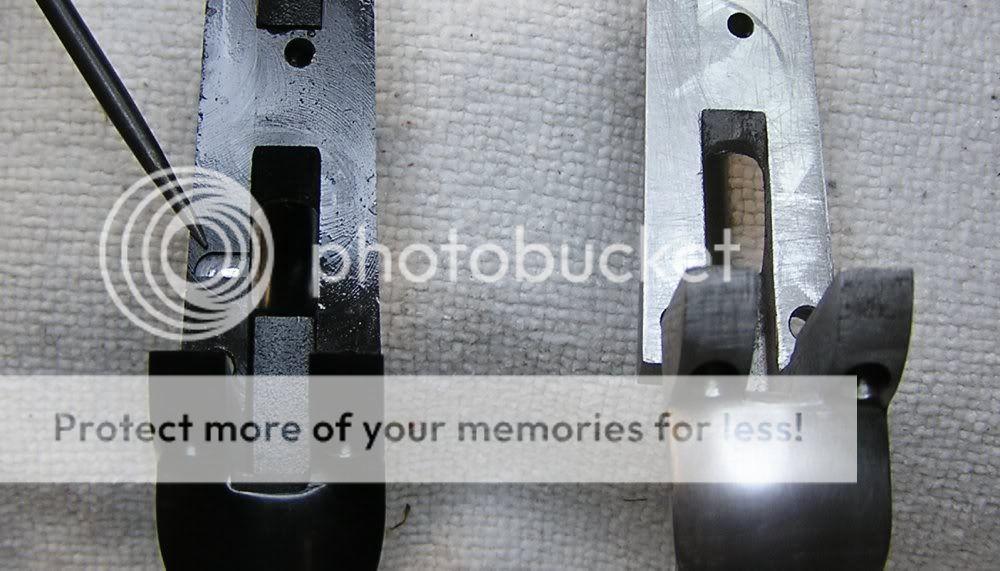
Ruger free spin pawl on the right:
Divot for free spin pawl on NM Flat Tops and New Vaqueros with the indexing pawl system shown on the left:
Cutting the divot: To locate this notch, take a measurement from the location on your original GF. Or mark that area on the replacement GF with a magic marker, assemble the GF to the gun, then cock the hammer a few times. This will leave a 'witness' mark in the marker ink, so you simply make the "divot" there. Be cautious not to let the cut extend to the outside edge of the grip frame or it will show when assembled, and don't cut notch too deep!
Use a thin cut-off blade in a Dremel tool. With grip frame in a vice, and your old grip frame nearby for reference, hold the Dremel with two hands for control. And replicate the divot in the new grip frame. You can also clamp the Dremel tool in the vice at an angle and hold the grip frame instead.
*** Internal Locks: Some of the past years NM XR3-RED aluminum and blue XR3 steel GFs have the internal lock (NOT current production). The lock can easily be eliminated using a Bearcat spring seat which is long enough to bridge the longer gap.
Lock shown here: http://www.gunblast.com/images/Hamm_Ruger-SA-GripFrames/DSC00231.jpg
Bearcat spring seat shown here: http://www.gunblast.com/images/Hamm_Ruger-SA-GripFrames/Dsc00106.jpg
Brownells #780-000-948AK, $2.12, here:
http://www.brownells.com/handgun-parts/frame-parts/mainspring-parts/mainsprings/mainspring-seat-sku780000948-11856-28534.aspx?sku=780000948
**** Grip Frame Projections shown here pointing to the left just above the two rear trigger guard screws and under where the hammer would be. To fit grip frames with projections to guns w/o the cut out in the cyl frame, just saw or grind off the projections:
*****Trigger springs when using NM GFs on OM guns. Ask me for: 'Adapting NM grip frame to OM 3 screw & OM to NM'.
2. Birds head grip frames: Although one of the easiest swaps and the correct vintage Birdshead is a drop in, two details to be aware of: 1. For Rugers with the Indexing Pawl System to align the cyl chambers with the loading gate chute, the preferred birdshead grip is one that came from a New Vaq. introduced in 2005. If not, the slight divot needs to be reproduced in the birdshead GF as explained above. Birdshead grip frames w/o the divot were introduced on the original Vaq in early 2002. All Birds Head grip frames have tall ears.
3. Bisley grip frames: Because of the standard plow handle main frame angle on old models and pre 1997 new models shown below, that were made for low eared grip frames, fitting the top of Bisley grip frames to Old model guns and pre 1997 NMs can be a little more challenging as you can see. If you try to maintain the angle of the main frame, you run out of metal on the Bisley grip before you would ever mate the two together. The solution is to carefully decrease the angle of the main frame at the recoil shield. Of course both spots will require a little touch up with cold blue on blue guns, but is in such a protected area, there's little chance of wearing it off. Plus the original grip frame will still mate up properly.

4. If your grip frame is an XR3 size or Bisley, the front grip strap is 1/8" closer to the back of the trigger guard than the standard XR3-RED size grip frames, SBH Dragoon, etc. The XR3-RED size aluminum and same size steel grip frames have the benefit of not rapping the knuckle under recoil.
Here's a good illustration of the increased difference (1/8") in horizontal finger distance behind the trigger guard on the Hunter (and standard XR3-RED size Gripframe), compared to the Bisley grip with less space. The Hunter and Bisley GFs I've measured are actually identical in vertical forestrap length space for fingers to the butt. But the Bisley is longer on the backstrap which I think is why some prefer it: http://www.dustinlinebaugh.com/gallery_009.htm
5. Just to be aware: the New Model flat top BH & NEW Vaquero XR3 size steel grip frames are 7/16" thick, all other steel and aluminum frames are 1/2" but this does not affect the interchangeability, just the feel in your hand.
You should check out this site for good illustrations of the different size grip frames, albeit, no interchangeability instructions.
http://www.gunblast.com/Hamm_Ruger-SA-GripFrames.htm
Note - when installing grip frames:
Always check the screw holes for machining chips left in them from production and clean them out if present. Install Install all five screws but do not cinch them tight. Align the grip frame edges flush with the cyl frame by tapping with the butt of a plastic handled screw driver. Tighten one trigger guard screw, then front screw and then one ear screw. Then tighten them all.
________________________________________
#1. REPLACING JUST HAMMER and/or PAWL:
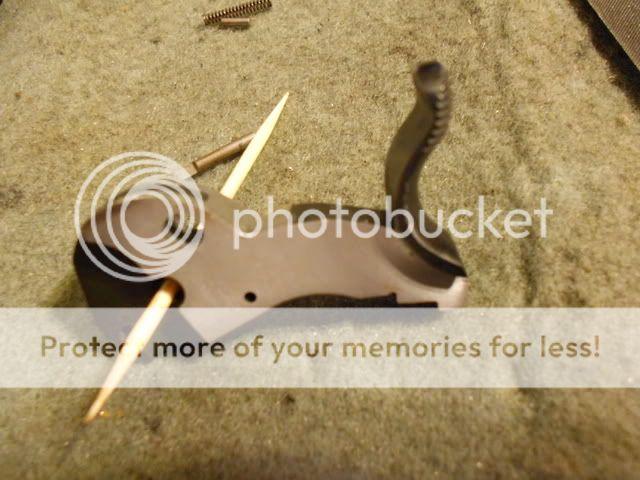
Recognize, you do not need to hassle with the PESKY LOADING GATE SPRING, pull the trigger pin, trigger OR transfer bar JUST to remove the hammer and pawl. Once you remove the grip frame, the hammer pin is the only other part you need to remove. Then just pull the hammer back and all the way down, then depress the hammer plunger in the base of the hammer with a small tipped screwdriver to clear the trigger extension where the transfer bar connects to it. Let the hammer & pawl fall out. Install in reverse! Piece o' cake.
NOTE: While you have the grip frame off, it's always good to examine the upper end of all the grip frame blind screw holes for thread shavings that weren't cleaned out from the factory and get crammed in there by the screws.
Also check the two trigger guard screw holes where they are exposed by the milling cut if your grip frame has the two projections that go into the main frame. Almost always there will be a huge flat 'roll-over' burr in each hole from the milling cuts that expose the holes. If they are present they generally cause the 1st 1/8" of removing those two screws to take extra effort to unscrew. You'll need to break off the burrs and pick them out with a dental pick or equivalent tool.
The newer guns no longer have these projections and milling cuts, but both early and late frames can have rollover burrs in those two screw holes from drilling the hammer pin hole.
#2. WHEN CHANGING hammers in New Model Rugers, the first thing to check is the transfer bar clearance with hammer for reliable firing pin function.
TO TEST HAMMER/TRANSFER BAR FOR MIS-FIRES:
With hammer fully cocked, press on the transfer bar to extend the firing pin and observe how far thru the recoil shield it protrudes. Now drop the hammer, keep the trigger pulled back and observe the firing pin again. If it doesn't protrude the same amount, you need to remove just enough metal from the hammer nose so the transfer bar is pushed tight against the firing pin and hammer channel. If you remove too much, the transfer bar will not perform its safety function. If firing pin protrudes the same amount, the problem is too weak of a spring. Also make sure hammer has no friction or contact with grip frame ears around its base to slow its fall; another potential issue when making hammer changes.
IF YOU MODIFY HAMMER NOSE:
At the range, double check the safety function by loading a live round under the hammer, point down range, cock the hammer, hold with thumb, release the trigger to uncock the hammer, take finger off trigger and release your thumb so the hammer falls. The round will not fire if safety transfer bar is functioning correctly.
#3. MODIFYING BISLEY HAMMER/TRIGGER FOR PLOW HANDLE OR BIRDSHEAD GRIP FRAME:
Before you trace your old hammer, make sure it fits flush with the grip frame 'ears'.
Use the hammer pivot pin to hold the original and new hammers together and scribe both sides, then grind, file, sand and re-blue (if blued), the portion you filed away.
I "hog off" most of the metal with an 1/8" x 1" Dremel course stone; hammer in a vise, or use a cutoff wheel mounted in a bench top grinder. Then true up the course grinding by 'draw filing' with a small double cut triangular file and then square up the corner. Finish with 400 grit paper wrapped around a 1/4" x 1/2" alum sanding block with flat surfaces, and re-blue with Brownells OxPho blue. That will match the factory finish which is left a bit course. For a higher polish, follow up with 800 grit and 1000 grit. Polish with a Dremel flannel wheel using white rouge made for polishing stainless steel. Then blue.
I usually take about 1/16" off the back of the hammer shank below the spur because they stick out from the frame recoil shield too far for my taste, but don't go too far or the hammer plunger/spring hole will be exposed. You'll notice the newest production hammers have narrower shanks.
BISLEY TRIGGER INSTALLATION: the slot in the grip frame must be extended 5/16" and the 45 degree angle at the front of the slot replicated to install the Bisley trigger in a plow handle or birdshead GF. The best way to do this is with a cutoff wheel in a Dremel tool. Another option is to shorten the front end of the Bisley hammer to fit the existing slot.
http://www.rugerforum.com/phpBB/viewtopic.php?p=1543606#1543606
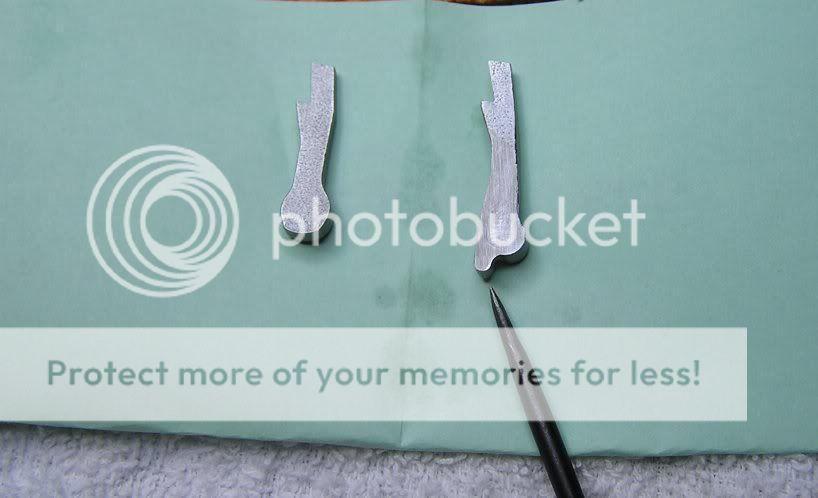
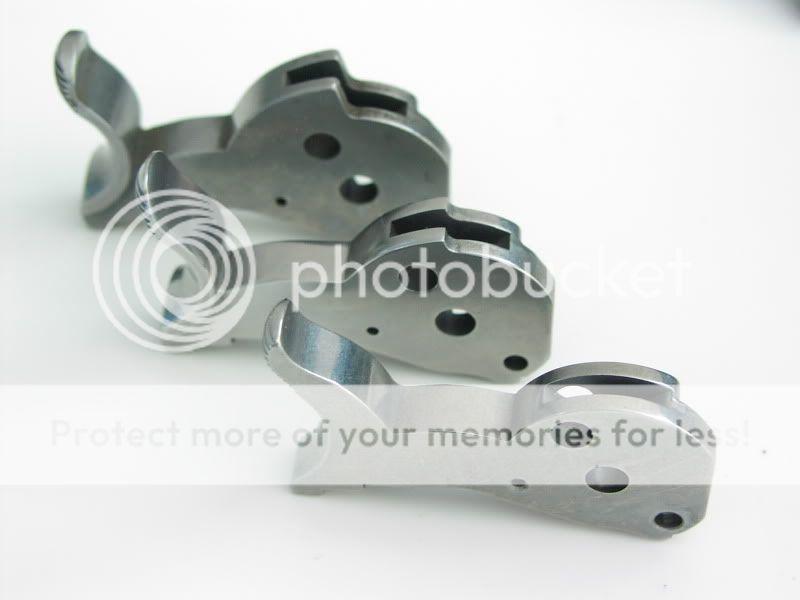
Stock Bisley hammer in rear, modified Bisley center and standard hammer in front (G2's photo):
Mine has part of the flare on the hammer spur removed as well to look more like a Super Blackhawk hammer.
Some standard NM hammer Notes:
Hammer Height Dimensions:
Montado, N Vaq, mid frame Flat Top Blackhawk, SBH 2.231"- 2.238"
Bisley Mid & Large Frame 2.245"
Original large frame Vaq 2.254"-2.255
Large frame Blackhawk and mid frame Flat Top BH 2.315"
Hammer Base sizes: Also, Ruger has only enlarged the base of the hammer to match the ears, on the new style hammers such as the New Vaq standard 'long horn' and Montado hammers, and the NM Flat Top Blackhawk hammers. All other existing hammers do not match.
The large base hammer followed Ruger's decision to simplify production about 1997 in the serial range 56-XXXXX (Vaqueros). Ruger raised the cylinder frame mating surfaces of the non-Bisley SAs (Blackhawks and Single Sixes) on both sides of the hammer to match the Bisley model frames so they could be assembled to any style grip frame.
Therefore the 'ears' on the standard grip frame had to be raised and enlarged as well. But it took Ruger awhile to use up existing small base hammer inventory before the enlarged base hammers, that matched/fit flush with the taller grip frame ears, were put into production. So for a few years guns were shipped with some ugly hammer/ear fits.
The thinner shank came along much later coinciding approximately with the 1st anniversary new mid-size and later large frame flat tops in 2005 and in my opinion are much better looking. I know of no other reason for it other than improved looks and/or small weight reduction.
Hope this helps,