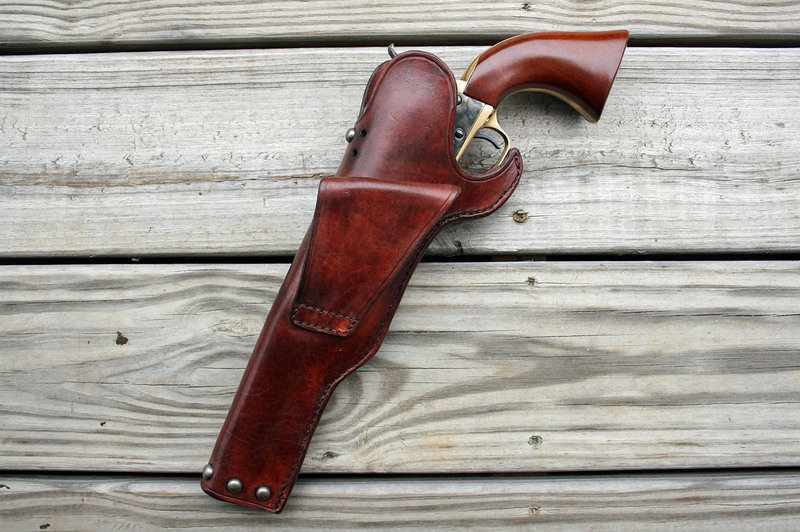
first holster attempt

45sixgun

Bearcat
Joined
Jan 23, 2012
Messages
50
For awhile I've been wanting a holster to carry my gun while I wander around the desert. I recently got inspired by Al Stohlman's book. Here is what I've done so far. I already messed things up big time by cutting the pattern backwards, so the rough side of the leather is facing out. I think I'm going to try sanding it and see how it smooths up. This is for my 4 5/8 .357 BH.

P1090382-001.JPG


P1090380-001.JPG


P1090386-001.JPG


P1090392-001.JPG


P1090394-001.JPG
 
Thats nice. Could leave it like it is, the smooth side of the leather on the inside wouldnt be as rough on the finish as far as holster wear is concerned. That and the lighter color of the rough side might better blend with sand color. Also, is the flap at the top meant to fold over to strap the gun in? Either way, I can't want to see it done!
 
I think desert wandering and a rough out holster just go together. No worry of scratching it up on the outside and the smooth inside would seem less likely to trap grit and sand to scratch up your gun. Go for it and keep us posted.

Deac45
 
rough out would be very cool... add a smooth side out strap around the middle in... something ala Duke style holster in a contrasting russet brown color and it would be smokin' cool looking
 
You could always cut the flap side to match the other and just put a separate belt loop on it. Like this high ride Slim Jim I made for a 3rd Model Dragoon.

IMG_1242b.jpg


IMG_1237b.jpg
 
After the comments, I'm feeling better about this. Thanks for the feedback. Good suggestion NorEaster, and Craig, love what you did with that Slim Jim.
 
I made one with the pattern backwards and ended up wit the rough side out. I actually like it that way :) I like the smooth leather up against the gun better too. Go ahead and finish the holster, I think you'll like it.
 
45Sixgun,
If you don't have them, there are a few tools that will help you finish the holster up.
You can order them from http://tandyleatherfactory.com or pick them up at one of their stores if you happen to have one in your neighborhood.
A stitching groover http://www.tandyleatherfactory.com/en-usd/search/searchresults/8074-00.aspx
An edge beveler http://www.tandyleatherfactory.com/en-usd/search/searchresults/8076-03.aspx
A lacing chisel http://www.tandyleatherfactory.com/en-usd/search/searchresults/88040-04.aspx
Pro's have all the tools and one could spend a small fortune aquiring them. I only have a few and it gets me by for what I have made.
I use the stitching groover to make the path for the lacing chisel to follow.
I have also used the groover to make a line border with good results.
I have just a 4 prong chisel, and it works for me; but you may want to get a 4 prong and a single prong as well.
The edge groover will put that nice finished looking bevel on the outside edge of your leather.
You could also get a bottle of gum tragacanth http://www.tandyleatherfactory.com/en-usd/search/searchresults/2620-01.aspx
Once you bevel the edge, you will paint some on the very edge of the leather and then using something to rub along the edge (like and edge slicker http://www.tandyleatherfactory.com/en-usd/search/searchresults/8122-00.aspx) it will polish up the edge. I use a dowel or have used the smooth part of a small screwdriver handle to do that.
Please keep us up to date on your project. It's always great to see someone achieve their goal.
 
Thanks, NorEaster! I don't have any tools, and was actually hoping to make some myself. My other hobby is blacksmithing. What I can't make I'll get from Tandy.

I dug around last night and found the perfect piece of leather to use with this holster. It's nice and dark to give an attractive contrast to the lighter holster leather. I sanded the rough side of the holster leather down to 220 grit, giving it an even texture. I don't know if I should go finer or not.

P1090405-001.JPG
 
I heard that the ping-pong balls are nitrocellulose. Dissolved in acetone they would produce nice nitro varnish that can be used on leather edges too.
 
Part of the fun of leather work is coming up with your own patterns and ideas.
Here is one of mine. I make my patterns using a piece of scrap leather and just wet mold it around the gun. I sometimes just glue the seam and whittle out the shape after it is dry. Like this one.
IMG_0449.jpg

IMG_0451.jpg

Lots of good patterns are available too. I like this one.
056.jpg

Here is another pattern I made up for CAS.
IMG_0223.jpg

Keep at it. You will find every one will get better than the last. :wink:
 
I like the idea of a roughout holster. I should think about having one made like that.
 
Thanks. I just started in leather 2 years ago and like many things I have gotten in to,Cowboy action shooting can get expensive, so I decided to learn the craft and make my own. :wink:
Leather working can get in your blood . I just picked up another 15 sq. ft. of leather today. What to make next???
Here are a couple more.
This Dodge City styled rig is holding an original Colt .44 1872 flat top.
IMG_0651.jpg

Here are a couple pancakes.
IMG_0662.jpg

My Ruger Security Six has a home also. It still was short the snap at that point and
the grip has been changed to a Hogue.
058.jpg

Leather crafting is a great hobby. Try it ,you will like it!! :wink:
 
Chuck 100 yd said:
Thanks. I just started in leather 2 years ago and like many things I have gotten in to,Cowboy action shooting can get expensive, so I decided to learn the craft and make my own. :wink:
Leather working can get in your blood . I just picked up another 15 sq. ft. of leather today. What to make next???
Here are a couple more.
This Dodge City styled rig is holding an original Colt .44 1872 flat top.
IMG_0651.jpg

Here are a couple pancakes.
IMG_0662.jpg

My Ruger Security Six has a home also. It still was short the snap at that point and
the grip has been changed to a Hogue.
058.jpg

Leather crafting is a great hobby. Try it ,you will like it!! :wink:
Very nice work!
 
I wouldn't know where to start but I've been down that road before. What kind of mechanical investment would one need? Where do the materials come from?
 
Made a little more progress tonight. Stitched on a decorative band. Then a hammer spur strap. Finally the belt loop. Next I'll cut the edge filler and stitch her together.

P1090476-001.JPG


P1090486-001.JPG


Thanks for sharing more of your work, Chuck. Pleasure to see as always.

GasGuzzler, if you have money to spend, check out Tandy. They have everything you could want. Even some nice youtube video instructionals. I'm going from a neat little book by Al Stohlman. I picked up a few scraps of leather pretty cheap from our local Tandy shop. For tools and such I'm just using what I already have. The specialized tools make it so much easier, but they're not absolutely necessary. I'm sure Chuck will have better advice from more experience.
 
GasGuzzler said:
What kind of mechanical investment would one need? Where do the materials come from?

Really, maybe five hand tools, and some form of stiching pony, which you could make with some scrap wood.

Tandy, Springfield Leather, and it looks like Hidecrafters has been taken over by Double K Leather Sales.
 
GasGuzzler , I use Tandy and Springfield Leather as my main supply houses.
Go here for lots of F.A.Q. info and a great bunch of guys who support each other like you have never seen before.
http://www.cascity.com/forumhall/index.php/board,57.0.html
As far as tools go. A box knife and needle and thread will get you started. Just like reloading. one can spend thousands on tools if you want but all that is not needed.
I drill all my holes for sewing and here is a picture of my stitching pony I made.
IMG_0073.jpg

here is a sheath I made to go with my CAS rig.
IMG_0097.jpg

The local Tandy store has a box where they put seconds and damaged pieces of leather. You can pick up some nice pieces to make holsters for cheap. :wink:
 
Nice stitching pony, Chuck....and gorgeous knife sheath....

Got my holster stitched together today. For this project I didn't buy or make a single tool. That's not to say I didn't wish for something to make parts of it easier.

This is the filler.

P1090487-001.JPG


Feathering the ends of the extra fillers for top and bottom. Bottom of the holster where the end of the barrel goes is 5 layers of leather thick. Top where the trigger guard is has 4 layers of leather. Feathering the edges made it blend in nicely.

P1090489-001.JPG


I still need to clean up the profile, burnish the edges, and put some kind of finish on it. I took it on a hike and it performed as I had hoped.

P1090493-001.JPG


P1090500-001.JPG
 
So far most of my stuff has come from Tandy. You really don't need a lot of tools. Those I would recommend are a good awl with a diamond tip and a stitching groover. It makes for a very neat looking stitch and since you're not actually removing material, it closes up nicely. Also an overstitch wheel and at least a #3 edge beveler. Get some good harness needles for stitching. Edges can be slicked with the available plastic or wood tools or with a piece of antler. Don't do what I did and waste a bunch of money on pre-dyed chrome-tanned leather. Buy a good 8-9oz vegetable tanned hide and dye your work yourself. You can use a utility knife and some pro's even use them but I've found a curved blade knife to work so much better for cutting around curves.

https://www.tandyleatherfactory.com/en-usd/home/department/Tools/Knives-Cutters-Splitters/3595-00.aspx

I also highly recommend Chuck Burrows DVD's on making holsters.
 
I cut out my holsters using my 14" Delta band saw with a 1/8" scroll saw blade.
By laying your leather on a piece of 1/8" MDF (medium density fiberboard,Peg board without the holes available everywhere for cheap)and cutting through both there is little tear out and you can get a very clean cut. Difficult to cut shapes are a snap.
IMG_0067.jpg

IMG_1931.jpg

Have fun!!
 
Nice work, especially for a first timer...your stitching is great. Not sure what you're using to stitch with (sewing awl?)...but it's working for you. I use the two needle technique, spacing the holes with a spur wheel and usually drilling them with a 1/16" bit because of the leather thickness. Gluing the welt and sides before drilling and stitching helps tremendously.

Here's a cpl of pics of some tools and pub's that have worked for me. I've been doing my own tack repair and holsters for a cpl decades now. The stitching horse made up by Chuck is invaluable, believe me, and easy to make... As to technique, I think you'll find the Tandy sells contact cement, either Barge or their own brand, that will help with future efforts. The guys at Tandy will teach you how to improve...good guys there. The local shop here in Louisville, KY actually sends leather and other supplies to my son in Afghanistan at cost...

Don't be discouraged about reversing the pattern while tracing...I once did it twice on the same holster and got it wrong anyway....(musta been into the KY "fruit-juice" too early that day). I still use that holster, but was never satisfied with the finish...I used a stain on it, plus a sealer, but don't have a pic of it. You might try "Snowproof" leather dressing...it's what El Paso Saddlery recommends, but you'll find that it too will darken the leather to a soft brown/amber...about like the one pic'd below.

The band saw technique works well for cutting out...and you can use a 2" drum sander on an electric drill to smooth the edges and slightly bevel them as well. Burnishing them with a piece of antler or smooth plastic after wetting will give you a durable edge without the need for a separate finish application.

I use "Snowproof" after wet molding the leather to the gun, (cover the gun with a baggie, then mold, then remove the gun and dry over an old incandescent light bulb or leave it for 24 hours in a dry place.) That's what's on the holster and gun belt below...plus about 5 years wear and aging around the farm here in KY.

Too, I think you'll find that the 2nd one you build will be even better...they're fun to make and you can get just what you like for your guns.

Best Regards, Rod

P1260943.jpg


P1260944.jpg


44Splinholster.jpg
Sm32Duke.jpg
 
Thanks, Chuck and Rod. Love that carved pattern, Chuck. Really want to try that next. Rod, I'm operating on a very low budget. I just used an awl I had for punching holes, eyeballing for spacing. I also used the two needle method for stitching, as shown in Stohlman's book "How to Make Holsters." I have no idea how I'm going to finish the holster, but I need to do something (preferably without spending any $). Last night I cleaned up the profile on my little belt sander, which improved its appearance nicely.
 
Back
Top