OK, here goes and please excuse some of the way I word things, I am by no means a professional writer but I think you'll get what I am trying to say.
The headspace and the B/C gap are controlled by 4 things; the size (length) of the cylinder, the barrel set back, the length of the crane barrel and the thickness of the ratchet. We will assume the cylinder is the correct dimensions (1.610 +/- 0.005 or so) and the ratchet is factory standard.
If the only problem is a too tight B/C gap, that is easily cured by taking a few thousandths off the rear of the barrel with a facing cutter.
If the crane barrel is too short, it would allow the cylinder to be forward too much, causing a too narrow B/C gap and too much headspace. It could also cause possible problems with the cylinder lock up due to the cylinder latch not mating with the cylinder latch slots - but there is probably enough play to lock up correctly. And being too short it could affect the ratchet/pawl (cocking, etc.) But a too short crane barrel can be stretched to make it longer and work correctly or shims can be added to lengthen it.
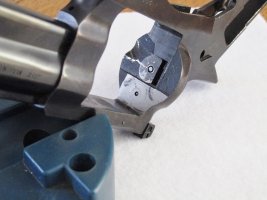
Now the fun part. If there is too little headspace, it could be several things. The ratchet may be too thin which allows the cylinder to go rearward too much but you would then probably see too much of a B/C gap or a lot of end play (forward and rearward motion of the cylinder within the frame when closed). This does not seem to apply in the OPs case. Or, the crane barrel is too long, thus pushing the cylinder to the rear.
The crane barrel is stopped inside the cylinder by a ridge/step (?) that is machined inside the cylinder at a specific depth. If the crane barrel is longer than normal, it will force the cylinder to the rear causing too little headspace and possibly causing the ratchet to bind against the frame. The binding can be fixed by removing some thickness of the ratchet but it would still have too little headspace.
My theory for the OPs gun - But I would really have to have it in front of me to do a close examination. First, remove a small amount of material from the rear of the crane barrel (amount to make the headspace correct, a few ten thousandths probably). This will then force the cylinder forward so next would be to use a facing cutter to bring the B/C gap to the correct dimensions. The amounts taken off the crane barrel would not (should not) affect the cylinder latch and cylinder slots alignment, nor affect the ratchet.
The crane barrel is such a length that it has enough room at the front (and in the retaining ball slot) to allow the cylinder to move forward this slight amount and it probably would not adversely affect anything else.
Just my thoughts, but again, after a close exam of what is going on, things may go in a whole different direction.
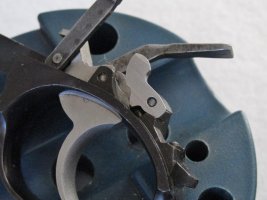
Oh, I did take an extra complete cylinder/crane assembly completely apart to look at everything to form my theory
Any thoughts, additonal things I might have forgotten about/overlooked, questions, etc. gladly accepted.
The headspace and the B/C gap are controlled by 4 things; the size (length) of the cylinder, the barrel set back, the length of the crane barrel and the thickness of the ratchet. We will assume the cylinder is the correct dimensions (1.610 +/- 0.005 or so) and the ratchet is factory standard.
If the only problem is a too tight B/C gap, that is easily cured by taking a few thousandths off the rear of the barrel with a facing cutter.
If the crane barrel is too short, it would allow the cylinder to be forward too much, causing a too narrow B/C gap and too much headspace. It could also cause possible problems with the cylinder lock up due to the cylinder latch not mating with the cylinder latch slots - but there is probably enough play to lock up correctly. And being too short it could affect the ratchet/pawl (cocking, etc.) But a too short crane barrel can be stretched to make it longer and work correctly or shims can be added to lengthen it.
Now the fun part. If there is too little headspace, it could be several things. The ratchet may be too thin which allows the cylinder to go rearward too much but you would then probably see too much of a B/C gap or a lot of end play (forward and rearward motion of the cylinder within the frame when closed). This does not seem to apply in the OPs case. Or, the crane barrel is too long, thus pushing the cylinder to the rear.
The crane barrel is stopped inside the cylinder by a ridge/step (?) that is machined inside the cylinder at a specific depth. If the crane barrel is longer than normal, it will force the cylinder to the rear causing too little headspace and possibly causing the ratchet to bind against the frame. The binding can be fixed by removing some thickness of the ratchet but it would still have too little headspace.
My theory for the OPs gun - But I would really have to have it in front of me to do a close examination. First, remove a small amount of material from the rear of the crane barrel (amount to make the headspace correct, a few ten thousandths probably). This will then force the cylinder forward so next would be to use a facing cutter to bring the B/C gap to the correct dimensions. The amounts taken off the crane barrel would not (should not) affect the cylinder latch and cylinder slots alignment, nor affect the ratchet.
The crane barrel is such a length that it has enough room at the front (and in the retaining ball slot) to allow the cylinder to move forward this slight amount and it probably would not adversely affect anything else.
Just my thoughts, but again, after a close exam of what is going on, things may go in a whole different direction.
Oh, I did take an extra complete cylinder/crane assembly completely apart to look at everything to form my theory
Any thoughts, additonal things I might have forgotten about/overlooked, questions, etc. gladly accepted.
")