Leatherwork

Help Support Ruger Forum:

CraigC

Hawkeye
Joined
May 27, 2002
Messages
5,197
Location
West Tennessee
I originally intended to do a whole series of articles on leatherwork but life got in the way. Here's a brief note about two of the most important aspects of leather work, edges and stitching.

Quality leatherwork is won and lost in edges and stitching. It's basic stuff but it's what separates the pros from the amateurs, or at least it should. I touched on this in my tutorial but in my opinion, to paraphrase my mentor Chuck Burrows, edge paint does not belong on professional leather work. Edges should be beveled, smoothed and burnished, not painted. Sanding and burnishing removes flaws but it takes time to do, while painting covers them up. Most pros do burnish their edges but some do not. I reckon it's a case of the consumer not knowing any better and paying a premium price based on reputation or name recognition, rather than a critical assessment of the maker's work. I'm on a knife sheath making Facebook group and a member recently posted pics of some sheaths he had done and the edges are spectacular. According to the maker, he spends an hour or more smoothing and burnishing his edges.

36750193_10213794762440617_3627246777943457792_n.jpg


36828219_10213798580976078_1940546325472870400_o.jpg


36779232_10213794763080633_4104003609681723392_n.jpg


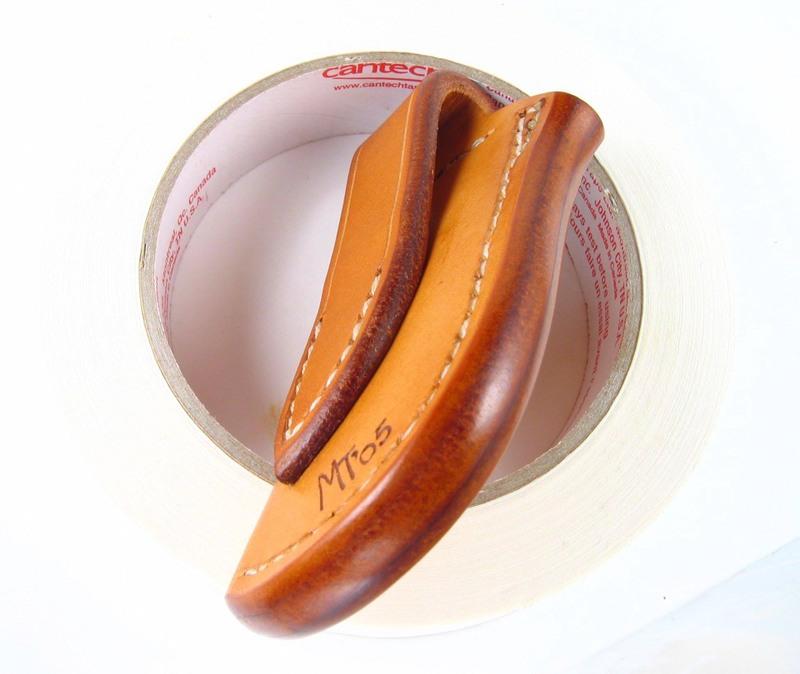
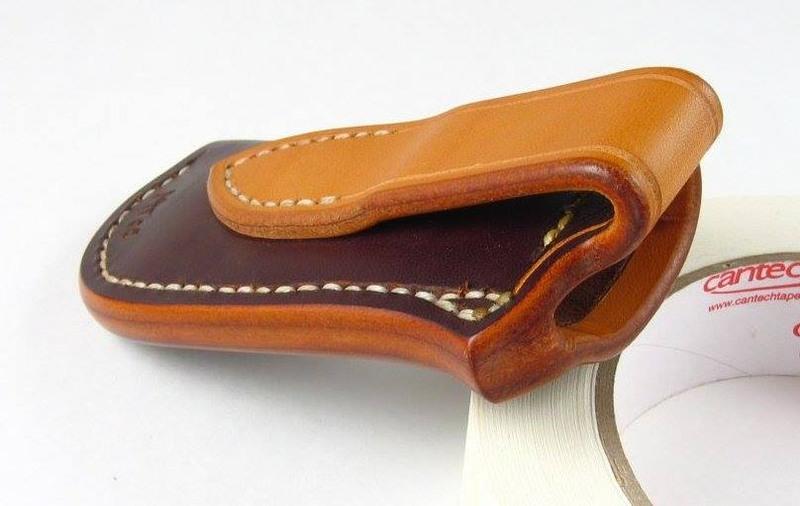
This is art. Every surface is carefully blended, none are untouched. I have seen none better and work I've seen touted as "the best" does not even come close to this. If you're paying exorbitant prices for plain leather goods with painted edges, rather than carefully burnished edges, maybe you need to look elsewhere?

Where this work falls short is in the stitching. While the stitching is 99% carefully executed and beautiful, perfectly spaced and a consistent distance from the edge, the downfall is that the holes are drilled. Drilling stitching holes on a drill press is popular because it's easy but it is far from ideal. The problem is that drilling removes material, whereas punching them with an awl or chisel (or machine stitching), simply separates the fibers of the material. Drilled holes never close up and will always have little thread tension. Punched holes have much better thread tension and will close up after stitching. Drilling also produces whiskers of leather around the holes, punching never does that. Stitching should fade into the background but drilled holes always stand out, at least to the discerning eye. In my opinion, even if you machine stitch, you should spend ten extra seconds with a harness needle pulling your front thread tail to the back before cutting it off.
 
Joined
Nov 5, 2007
Messages
9,733
Location
Dallas, TX
Thanks for the info. I can see what you mean about the drilled holes. You can see the holes in the first picture.

However, I should add, had you not mentioned it, I never would have known.

The edges do look very nice, you're right.
 

Hondo44

Hawkeye
Joined
Apr 3, 2009
Messages
8,051
Location
People's Republik of California
Craig,

Excellent example of proper edging. And right again on the stitching holes, should not be drilled, but cut with awl or needle. An angled hole cut with needle or awl also gives authentic angled stitches look.

At least the maker did V cut over the holes to recess and protect the stitching. And double stitched his beginning and end with tails pulled thru to the back.
 

Enigma

Hunter
Joined
Apr 17, 2002
Messages
2,521
Location
Houston metro area, TX
Very interesting! I'll have to dig out the few holsters that I have with me here in Korea (from two highly regarded makers), and examine the stitches and edging now. As I recall, one maker's edging is excellent, but I'll have to verify.

ETA: Well, a very popular, highly regarded, top-shelf (and expensive) maker drills his thread holes, but his edges are very carefully burnished. Another very popular, but less expensive maker appears to actually use either needle or awl to make his thread holes, but his edges are not as well burnished as the other maker's are. I'm not sure if that actually proves anything, but it is enlightening.
 

Chuck 100 yd

Hunter
Joined
Mar 20, 2010
Messages
3,251
Location
Ridgefield WA
I hand sew my leather pieces and drill the holes using a very small drill. The drilled holes are then enlarged using an awl. I sew using very heavy thread,saddle stitching at a five stitch per inch spacing. My leather work is almost all for my own use
And not for sale. The quality of leather available today seem to be way poorer than in the past unless you want to spend very large bux.
 

Bobshouse1

Bearcat
Joined
Dec 31, 2017
Messages
14
Another sign of poor work is signing the leather product with magic marker on the exterior where it is visible. A stamp is more professional looking hidden in an area that is not visible when wearing.
 

CraigC

Hawkeye
Joined
May 27, 2002
Messages
5,197
Location
West Tennessee
In this case, I think it's marked with an electric iron. Some folks don't want to invest the $200 for a maker's stamp. For period pieces, burning is actually preferable.
 

GunnyGene

Hawkeye
Joined
Nov 23, 2013
Messages
9,375
Location
Monroe County, MS
CraigC said:
In this case, I think it's marked with an electric iron. Some folks don't want to invest the $200 for a maker's stamp. For period pieces, burning is actually preferable.

Well, I reckon I chose wisely when I picked Diamond D holsters. The 2 I have meet all of your criteria - at least to my untrained eye. :)
 

David Bradshaw

Blackhawk
Joined
Sep 11, 2012
Messages
933
Bobshouse1 said:
Another sign of poor work is signing the leather product with magic marker on the exterior where it is visible. A stamp is more professional looking hidden in an area that is not visible when wearing.

*****

How leather is signed, or stamped, has nothing doing with the quality of work. Quality of work is its own measure.

True, it is traditional to stamp or sign a scabbard on the backside.
David Bradshaw
 

eveled

Hawkeye
Joined
Apr 3, 2012
Messages
5,610
Good post, very enlightening. Its good to be an educated consumer. Realize what you are paying for, and make sure you are getting it.

How do you feel about rivets? Especially on a knife sheeth.
 

CraigC

Hawkeye
Joined
May 27, 2002
Messages
5,197
Location
West Tennessee
eveled said:
Good post, very enlightening. Its good to be an educated consumer. Realize what you are paying for, and make sure you are getting it.

How do you feel about rivets? Especially on a knife sheeth.
Sorry for the late response, I remembered reading it and then couldn't find it to respond.

Rivets can be extremely useful at high stress points, to reinforce the stitching at a likely break point. Or to secure things like strap or belt loop ends where it's not really desirable to stitch it. They can also be used decoratively. Although i think many times they are over-used, or used as a poor substitute for stitching, because they tend to be quicker and easier.
 

eveled

Hawkeye
Joined
Apr 3, 2012
Messages
5,610
Thanks. I asked, because I like rivets in the stress points, but some say rivets are a sign of inferior work. I would have liked seeing the other articles you had planned.
 

Rodfac

Blackhawk
Joined
Mar 11, 2009
Messages
691
Location
Kentucky
Quality leatherwork is won and lost in edges and stitching. It's basic stuff but it's what separates the pros from the amateurs, or at least it should.
Too true Craig, too true.

I use a diamond awl and or a stitching chisel with my stitch work but only up to a point. With leather holsters where the welt plus the front and back sides can add up to 3/8+ of an inch, either is just not practical. I drill the holes where necessary, but not with a twist drill; instead I use a needle of slightly greater dia. than my two stitching needles which allows the resulting over-lapping, single overhand knotted, double strand of thread to pass through. This allows the leather to 'close up' over the stitching when I'm finished. Most times it takes a pair of needle nose pliers to pull the needles through each hole...and it's linen thread too. I don't like nylon thread as it doesn't look as good in the stitch line. A gentle over pass with my spacing star, embeds the stitching, and a final gently, hammering with a rawhide mallet finishes it all up.

Burnishing itself, is an art, as is staining without blotching. I use antler for my burnisher in tight areas, and a Tandy leather tool on the rest. Staining down into the end cuts, then burnishing over the resultant, works into a good tight finished edge, that'l hold up. I don't like 'edge dressing' for its shiny appearance.

Lining belts or holsters adds another layer of complexity, especially if staining any thing except black. I burnish the edges after beveling and get good results, but it's easy to mess up a great holster with lousy burnishing. I glue my linings in place using barge cement, thinned of course, but have never mastered the art of folding the lining over the burnished edge then stitching down the resultant 'rolled welt'.

I spot glue the fold over belt loop on a Tom Threepersons type, then stitch it down, after grooving for the stitches both inside the holster and outside where it rides against the pants leg. Also glue the rear welt edge, careful to keep the glue off the soon to be burnished edge.

While any home craftsman can, with less than $100 worth of tools and leather, build a good strong useful holster, it may take a life time of learning to make a truly beautiful one, and that's the fun of it. Just some notes here from an old tack & saddle fixer and part time holster and belt maker.

YMMV, Rod
 
Top