Hi Don,
Well I seldom disagree with Hamilton, but this time I respectfully have to say that's not true! And also know sometomes he just doesn't want to do some things. In fact that would be so low on the scale of difficulty, that Anyone who could disassemble and reassemble a grip frame from a Ruger single action can do it. And it's truly the simplest grip frame swap of all the Ruger swaps.
I'll share my grip frame swapping tutorial with you which covers the Birdshead in A. 4. Below that is a list of other 1st class smiths who can do it and your barrel shortening, if you still aren't comfortable with it. Also below that are helpful factory videos.
A. INTERCHAGEABILITY OF GRIP FRAMES:
In general: all Ruger SA grip frames including SBH Dragoon, Blackhawk, Single Six, Old Army, Bisley and Birdshead (excluding Bearcats of course) will interchange from the standpoint of the screw pattern from Single Six to Super BH, Old Model to New Model, and even NM to OM. New grip frames are only partially finished and will need fitting, and bluing or polishing if stainless steel. Take off grip frames are much less work.
All the screws, springs and pins can be transferred over from existing GF.
BISLEY GRIP FRAME exception is that you need the two hex head capscrews around the ears for installing a Bisley GF. Or two regular screws if removing a Bisley GF. The Bisley grip frame is .177" (almost 3/16") closer to the trigger guard than the standard XR3-RED size (aluminum and steel), the SBH Dragoon, and the SBH Hunter grip frames.
Depending on model and vintage, be aware of:
1. Matching the grip frame 'ears' to main frame & hammer
2. Grip frame projections
3. Grip frames with internal locks
4. Birdshead/Bisley grip frames
5. "Reverse Indexing Pawl System" on NM Flat Tops and New Vaqueros
6. NM grip frame adaption to old models; trigger return spring
7. Old Model grip frame to NM main frame
Grip frame installation:
Always unhook both legs of the trigger spring for reassembly.
Always leave the cyl out so you can confirm the cyl latch spring/plunger is properly aligned on the latch so it has tension on it by seeing it sticking up thru the frame, before putting in any grip frame screws.
The cyl hand spring to the left side of the hammer goes plunger first.
Install all five screws but do not cinch them tight. Align the grip frame edges flush with the cyl frame by tapping with the butt of a plastic handled screw driver. Tighten one trigger guard screw, then front screw and then one ear screw. Then tighten them all.
Note: I always check the grip frame screw holes for machining chips left in them (especially stainless guns) from threading the holes for cleaning out if present. The two screw holes behind the trigger guard usually have huge rollover burrs from drilling the hammer pin hole and milling the frame. This will cause screws to screw in too tight and/or break off.
1. Grip Frame Ear Changes to be aware of: the ear height around the base of the hammer varies on all grip frame ears slightly due to hand fitting at the factory, but there was one specific big height increase. To simplify production in 1997, Ruger increased the height of the standard cylinder frame mating surfaces on both sides of the hammer 1/16" to match the Bisley model frame ears so any style grip frame could be assembled to any main frame. Therefore the ears on all other standard grip frames after 1997 had to be made ~ 1/16" taller as well. So there's basically two sizes: as short as .530" pre 1997 and as tall as .590" after 1997 (for example: Original Vaqueros over serial range 56-XXXXX). Measure from the very top edge of the grip panel to the top of the ears. That's why swaps are simplified if any acquired grip frame matches the vintage of your Ruger that you want to put it on. This also affects the hammer base fit to the grip frame ears.
The grip frame 'ears':
Raised main frame surface:
Photo by medicdave
Ears & Hammer Base sizes: Ruger has only enlarged the hammer base to match the taller grip frame ears on the newly designed hammers introduced since 2005 such as the New Vaq standard 'long horn' and Montado hammers, the NM Flat Top Blackhawk hammers, (and the new .327 Single Seven hammers?). All other hammers designed prior to 2005 used on current model and Old Model guns are small base and do not match the post 1997 tall eared grip frames. Some people don't mind. If I install a small base hammer in a post 1997 gun, I fit the grip frame ears to the hammer. I also have to do this every time I install post 1997 grip frames such as the N Vaq and Flat Top XR3 size steel grip frames or XRE-RED size steel grip frames on pre 1997 New Models, or on Old Model Rugers.
Proper hammer base flush fit to ears:
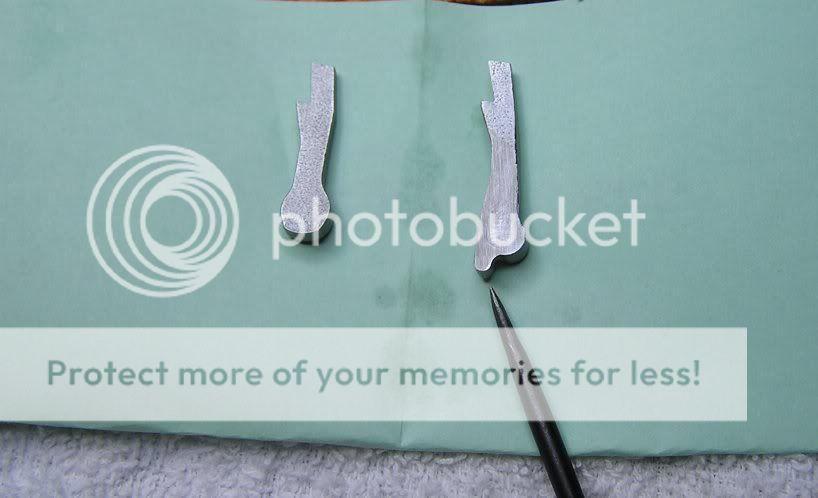
The top small base hammers 1.071" – 1.076" (measured in line with the two outside holes) predates the c. 2005 large base newly introduced model hammer designs. Measured on the centerline of the two large holes from back of hammer base to over the full cock notch.
Bottom hammer is a new Flat Top Blackhawk with large base 1.122" – 1.130" and narrow shank.
Mike Campbell photo.
Narrower shank hammers (except Montado hammers) coincide with the larger base hammer design on the New Vaqs and the 1st anniversary new mid-size in 2005 flat tops and 2006 and later large frame flat tops, and in my opinion are much better looking. I know of no other reason for it other than the improved looks. For many years I was relieving the shanks by hand.
Right hand hammer is after c. 2005 up to current production with large base 1.122" – 1.130" and narrow shank.
Mike Campbell photo.
http://www.rugerforum.com/phpBB3/viewtopic.php?f=3&t=213730&p=2136804#p2136804
MY SHORTCUT FOR REMOVING JUST HAMMER and/or PAWL:
Recognize, you do not need to hassle with the PESKY LOADING GATE SPRING, pull the trigger pin, OR trigger/transfer bar JUST to remove the hammer and pawl. Once you remove the grip frame, the hammer pin is the only other part you need to remove. After that, just pull the hammer back and all the way down, then depress the hammer plunger in the base of the hammer with a small tipped screwdriver to clear the trigger extension where the transfer bar connects to it. Let the hammer & pawl fall out. Install in reverse! Piece o' cake.
NOTE: New Vaquero and NM Flat Tops use a hammer spring with slightly less tension but that has nothing to do with the internal lock. Ruger supplied the new spring due to SASS customer demand. It does not need to be changed for reliable ignition and in fact I prefer it. Especially so when I use it in my Single Sixes with their shorter hammer and resulting less leverage!
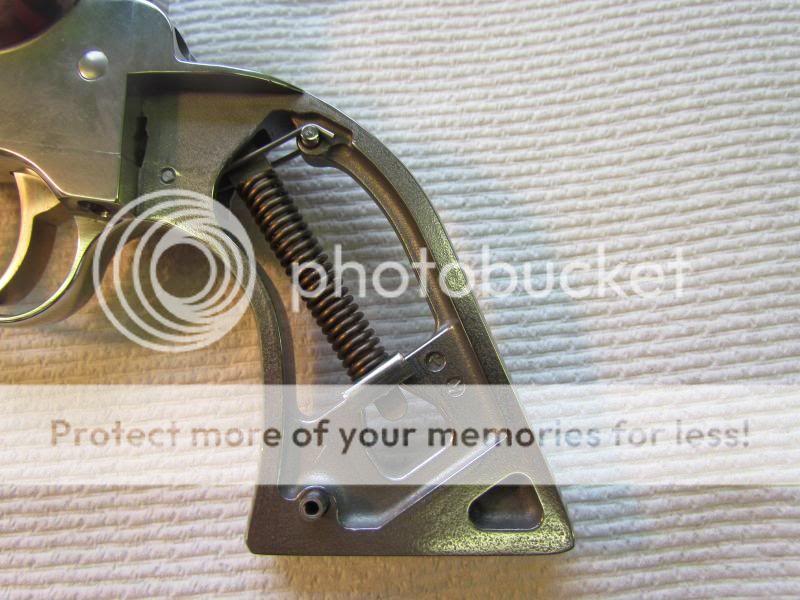
2. Grip Frame Projections shown here pointing to the left just above the two rear trigger guard screws and either side of where the hammer would be. To fit grip frames with projections to guns w/o the cut out in the cyl frame, just saw or grind off the projections, they are not needed on steel grip frames:
3. Internal locks: To replace a grip frame with an internal lock with one that was not made for the lock, all the internal parts and the hammer spring can be transferred to the replacement grip frame, except for the lock of course. But a standard spring perch, Ruger # KXR00500, or the Bearcat perch discussed below for its added advantages, is needed to mount the hammer spring.
Or just the Bearcat spring perch can be used to eliminate the lock from a grip frame that has one, see below.
When the locks first made their appearance in 2005 on the .357 Anniversary model Flat Top Blackhawk and New Vaquero, I started making and selling this titanium lock bypass seat:
Back in 2007 I had my Bearcat apart and noticed that its spring seat is the longest seat made for any of the Ruger single actions, go figure!! It just bridges the gap in the grip frames made for the internal lock and I posted its use as a replacement for the lock, on the other Ruger forum at the time.
It's a $2.00 Ruger part, that's all I use now, and quit making/selling my own.
The beauty of the Bearcat spring seat is that it disassembles the same way as the lock with the disassembly pin hole right below the spring so the spring never has to be dismounted from it's strut, which can be a gruesome task for many.
To swap the Bearcat spring seat for the lock is the easiest swap there is. You don't even need to remove the grip frame, just the grips! After cocking the hammer, a disassembly pin like a nail is inserted into the spring strut hole thru the groove in the top edge of the lock. Now uncock the hammer so the spring and strut have play. This allows the lock to be wedged up and out of the grip frame, and off of the strut. Because the temporary pin used to hold the spring compressed, fits in the groove on the top of the lock, the spring is still captured on the strut.
Therefore the strut and spring assembly doesn't need removal from the hammer slot. More importantly, nor does the spring need to be dismounted from the strut like Ruger SAs w/o the lock, where the disassembly pin is inserted below the spring seat which is captured on the strut along with the spring.
With the regular spring seats captured on the strut with the spring, the grip frame must be removed or at least loosened to change spring weights. It's also more difficult to mount a spring and a seat on the strut, rather than just a spring.
Now once the lock is out of the grip frame, the Bearcat seat slips on the bottom end of the strut below the spring retaining pin. The Bearcat seat also has a round hole in it for the end of the strut, so once on the strut, it can be pivoted 90 degrees, strut and seat moved into position over the gap in the grip frame where the lock was, then pivoted 90 degrees onto the two shelves of the gap.
Now hold in place, cock the hammer, remove the spring retaining pin, and drop the hammer. Voila, all done. The seat doesn't overhang the gap very much on either side but once the spring tension is applied, the seat is held tightly in place.
I've been using these for years on dozens of guns and never had one slip yet. Some have reported issues retaining the Bearcat seat on the round corners of the gap: you can file a small shelf on either side of the gap in the grip frame, to insure the seat doesn't slip out, but not necessary in my experience. If you have a Ruger with the new grip spacer and it doesn't fit back in the gun when installing the grips, the bearcat seat must be mounted in the other direction for the spacer to clear the hammer spring.
There you have it, the history of the Bearcat seat replacement for the Ruger lock which was discontinued in 2012.
I even use the Bearcat spring seat on other Ruger's w/o the lock so I can quickly try different spring weights which pre-mounted on spare struts because of the easy changeability with the Bearcat seat!
This is especially helpful on the single sixes because they have the same tension springs as the larger Blackhawks, but their shorter hammer has less leverage than the larger frames. .22s do need stiffer springs to detonate rim fire cartridges, especially the 22 Mags, but the Ruger springs are overkill IMO.
Therefore I experiment with spring tensions until I get a compromise of reliability of ignition and easier hammer cocking for my grand kids.
NOTE: the hammer springs that come with the lock in the New Vaqueros and Flat Top Blackhawks only, are only 25 coils since they were designed to be softer/lighter by Ruger for Cowboy Action shooters. I always retain them when removing locks and also use them as replacements in all other Ruger SAs.
Lock shown here: http://www.gunblast.com/images/Hamm_Ruger-SA-GripFrames/DSC00231.jpg
Bearcat spring seat shown here: http://www.gunblast.com/images/Hamm_Ruger-SA-GripFrames/Dsc00106.jpg
From Brownells #780-000-948AK, $2.12, here:
http://www.brownells.com/handgun-parts/frame-parts/mainspring-parts/mainsprings/mainspring-seat-sku780000948-11856-28534.aspx?sku=780000948
Or order direct from Ruger # PRO3603
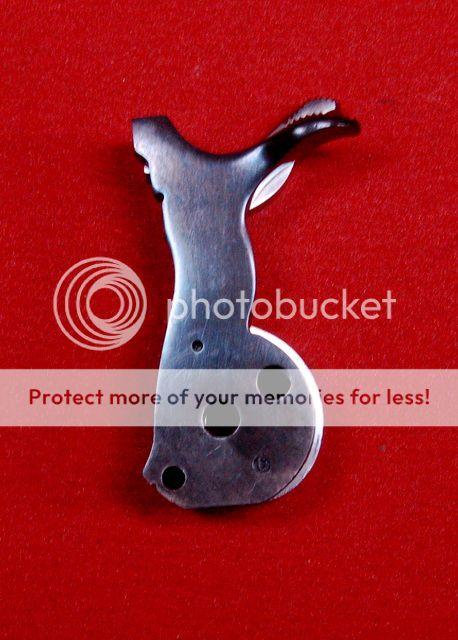
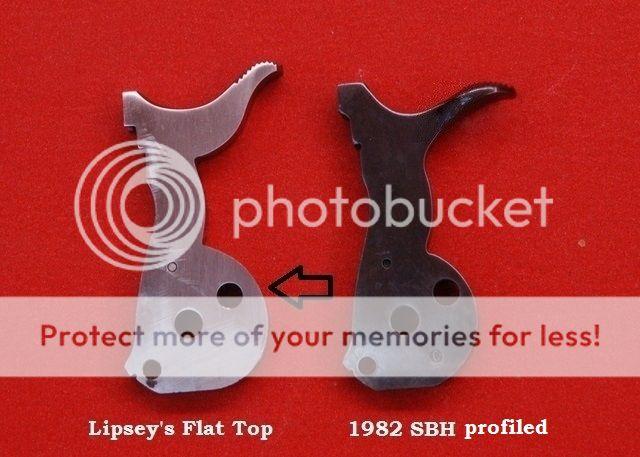
4. Birds head/Bisley grip frames: although one of the easiest swaps three details to be aware of:
1st) For Rugers with the Reverse Indexing Pawl System to align the cyl chambers with the loading gate trough, the preferred birdshead/Bisley grip is one that came from a New Vaq. or NM Flat Top Blackhawk introduced in 2005. If not, a slight divot needs to be reproduced in the birdshead/bisley GF. Current production have the divot and do not have the projections into the frame. Birdshead grip frames w/o the divot were introduced on the original Vaq in early 2002.
2nd) All BH & Bisley grip frames have tall ears to fit post 1997 guns.
3rd) All grip frame pins, screws and hammer spring can be swapped over, except the Bisley GF will need two socket head screws at the hammer. Screws, blue $2.12 (2 required) http://www.brownells.com/handgun-parts/grip-parts/grip-screws/grip-frame-screw-b-back-prod12143.aspx
You don't have to use a Bisley hammer and trigger.
4th) Ruger BH grip frames are too wide in the middle to just round off standard plow handle shaped grips to fit, even the larger Super BH grips panels, unless you trim ~ 1/8" from the Ruger BH grip frame back strap from the middle up to the top to match, of course. Some aftermarket BHs like Qualite will allow the use of rounded off Ruger plow handle grip panels however.
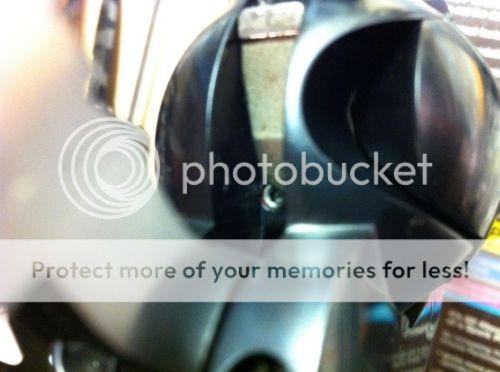
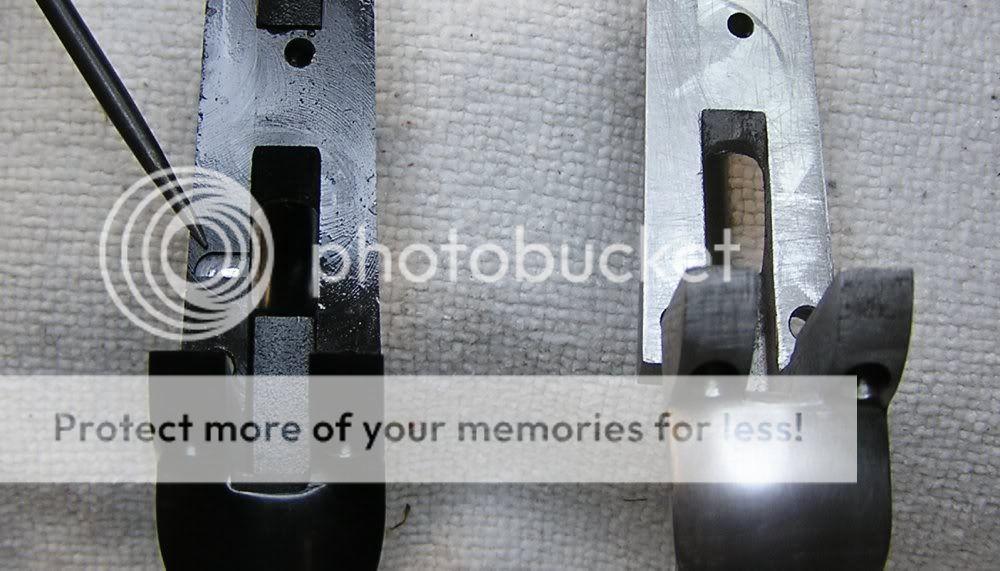
5. Reverse Indexing Pawl System All the NM FT Blackhawks and NEW Vaqs have this system which allows the cyl to roll backwards enough and stop for the chambers to align to the loading gate trough without the hammer on half cock (which can't be done on standard new models). You can see the device (3 parts) in the hammer channel to the lower left of the cyl pin hole shown below. Grip frames from models w/o this system need a divot cut above the trigger guard for the free spin cyl pawl.
Hex retaining screw for indexing pawl and spring in hammer channel:
Ruger free spin pawl on the right:
Divot for free spin pawl on NM Flat Tops and New Vaqueros with the reverse indexing pawl system shown on the left:
Cutting the divot: To locate this notch, take a measurement from the location on your original GF. Or mark that area on the replacement GF with a magic marker, assemble the GF to the gun, then cock the hammer a few times. This will leave a 'witness' mark in the marker ink, so you simply make the "divot" there. Be cautious not to let the cut extend to the outside edge of the grip frame or it will show when assembled, and don't cut notch too deep!
Use a thin cut-off blade in a Dremel tool. With grip frame in a vice, and your old grip frame nearby for reference, hold the Dremel with two hands for control. And replicate the divot in the new grip frame. It's easier to clamp the Dremel tool in the vice at an angle and hold the grip frame instead.
"Reverse Indexing Pawl System" parts:
Names of parts, Ruger Part #s & Brownell Part #s (about $15 total):
Cylinder Rotation Stop Screw KMVQ04501 780-001-294ah
Ejector Alignment Pawl (not to be confused with the Cyl pawl) KMVQ04502 780-001-292ah
Cylinder rotation Stop Spring KMVQ04500 780-001-293ah
Cyl free spin pawl (must be shortened for single six frame size) KMVQ00701 780-001-296WB
Or just modify your pawl to a free wheel cylinder pawl. No cost and almost no skill required, and won'y have to cut a divot in grip frame if your new grip frame doesn't have one:
http://marauder.homestead.com/files/FreeSpin.html
EXCEPTION: Some early Anniv models don't have the divot:
6. NM grip frame adaption to use old model trigger return spring.
It's a piece of cake, a fairly easy swap. I put steel Ruger NM steel grip frames on many of my OMs. (and OM grip frames on NMs). Here's a couple of OMs with NM steel grips frames:
Notice the ears on this birdshead around the hammer still need to be fitted to the main frame:
Ruger didn't make any OM Birdshead grip frames. NM birdshead grip frames from Ruger are carbon or stainless steel, will come in the rough, and are a lot of work to fit to your gun, then you'll have to get it blued or polish the stainless GF. Best way to get a Birdshead GF and grips is to buy a used 'take off' either blue or stainless (there are none made of aluminum alloy); post a 'Want To Buy' in this forum's classifieds, or search ebay and Gunbroker.
Power Customs does make a 2 piece (like a Colt) for about $200 and they are top quality. I have used them. There are no modifications or any other parts needed (except Colt grips) to go on an OM. But they are not ready to just screw on, they take final match fitting to your OM main frame, the rear corner must be ground off if you want a birdshead shape, and they'll need to be blued, or polished if you choose the stainless version which is $30 more.
In general: All Ruger SA grip frames including SBH Dragoon, Old Army, Bisley and Birdshead (excluding Bearcats of course) will interchange from the standpoint of the screw pattern from Single Six to Super BH, Old Model to New Model, and even NM to OM.
The hammer and trigger, all the screws, mainspring/spring seat/strut, and pins can be transferred over from your OM Grip Frame.
But if you want a Bisley hammer, you'll need a Clements Bisley OM hammer.
THE ONLY ADAPTATION NEEDED FOR A NEW MODEL GRIP FRAME TO AN OLD MODEL IS THE TRIGGER AND RETURN SPRING, AND THERE ARE 3 OPTIONS:
1. You can use the NM trigger return spring on old model guns with a Clements adapter trigger. This is the easiest way and the trigger is wide to fit the wide trigger slot in all NM grip frames. This is required if you want a Bisley trigger.
You'll also need the NM grip frame trigger return spring and both pins to use a Clements trigger.
___________________________Clements adapter triggers are the center two_________________________
OM trigger__________________standard____&____Bisley w/over travel stop__________________NM Bisley
They are $65 and are a 'drop in'. http://www.clementscustomguns.com/
2. Another option is to use your OM trigger and return spring/plunger. The OM Super BH/Ruger old army triggers are wide to fill the wide slot in the NM GF, but hard to find and more than $45 if you do. And you'll need one of the adapter methods below:
You can make the simple aluminum adapter above to fit in the NM GF behind the old model trigger or just use a .22 LR case to hold the return spring and plunger. Either will need the one NM trigger return spring retaining pin closest to the trigger shown below to hold your OM trigger return spring/plunger adapter or .22 case in place. File a small notch in the .22 case head to nest on the retaining pin.
3. The very easiest swap is a Ruger Old Army steel or SS old model style grip frame already designed for the old model plunger and return spring. They also have a wide trigger slot. The Clements adapter trigger with the shelf for NM return spring ground off is easier and cheaper than finding an OM wide trigger.
Bisley grip frames:
Because of the standard plow handle main frame angle on old models and pre 1997 new models shown below, that were made for low eared grip frames, fitting the top of Bisley grip frames to Old model guns and pre 1997 NMs can be a little more challenging as you can see. If you try to maintain the angle of the main frame, you run out of metal on the Bisley grip before you would ever mate the two together. The solution is to carefully decrease the angle of the main frame at the recoil shield. Of course both spots will require a little touch up with cold blue on blue guns, but is in such a protected area, there's little chance of wearing it off. Plus the original grip frame will still mate up properly. NOTE: The Bisley grip frame is .177" (almost 3/16") closer to the trigger guard than the standard XR3-RED size (aluminum and steel), the SBH Dragoon, and the SBH Hunter grip frames.
7. OLD Model grip frames adapted to NEW Model guns with simple modifications:
The OM SBH and Old Army black powder steel and SS grip frames are the easiest because they already have a wide trigger slot for the NM triggers which are all wide.
1. Drill a hole in the OM grip frame above the trigger guard for the cyl bolt NM plunger & return spring. Replicate the location of the hole from the NM GF.
2. Grind off the spring shelf web on the back of the NM trigger and use the OM trigger return spring and plunger.
3. For other than the SBH and Old Army black powder grip frames with wide slots, the NM trigger must be narrowed or the OM GF trigger slot must be widened, your choice. You may have to lengthen the rear of the slot just a bit for the trigger to go far enough back to release the hammer. Makes a great trigger stop too if you lengthen the slot just enough. There you have it, piece 'o cake.
4. BRASS FRAMES OM ADAPTATION TO NMs (Factory Ruger brass grip frames were only made for old models):
Marked "MR-3DB." = Super Blackhawk Brass "Dragoon" style with square back trigger guard. Same dimensions as 1959 Super Blackhawk. Initially for Super Blackhawks only, then shipped on various Blackhawks, majority in 1972. The ears on these are too short for post 1997 New Models. But all you need to do to use it on an earlier new Model is a hole drilled for the NM cyl latch return spring and plunger above the trigger guard, and a 1/16" lengthening of the front of the trigger slot. Plus a slight trigger modification by grinding off the bump on the rear of the trigger to use the old model trigger return spring and plunger. Or removal of material behind the trigger and two holes drilled for two added pins to accommodate the NM trigger return spring.
B. IN A NUTSHELL, THERE ARE THREE BASIC RUGER 'PLOW HANDLE' GRIP SIZES*:
Just be aware: the New Model flat top BH & NEW Vaquero XR3 size steel grip frames are 7/16" thick, old model XR3 size and all other steel and aluminum frames are 1/2". The SBH grip frame shown is for the 7 1/2" and 10" models. All other SBH grip frames are the XR3-RED size shown:
*There are also XR3-RED 'short' plow handle grip frames only supplied on the .32 H&R Mag Single Six Vaquerito which are ¼" vertically shorter than the XR3 and XR3-RED standard grip frames.
Approximate weight differences:
Standard size: Steel 6.5 oz., aluminum 2 oz., 4.5 oz savings.
Steel ejector rod housing 1.5 oz., alum .5 oz.
Lock weight .5 oz.
C. THE BISLEY GRIP & KNUCKLE SPACE BEHIND TRIGGER GUARD
puts more absorption of the recoil in your hand and arm and less of the impact is dissipated by the 'roll up' of the gun in the hand.
A Bisley is similar to shooting a S&W DA 44 Mag compared to a Ruger 44 Mag SA plow handle. The Smith grip hurts more.
Also comparing recoil with a Bisley grip to the smaller size plow handle grip is hardly a valid comparison. I still prefer the plow handle grip but I much prefer the large size plow handle to the Bisley:
I don't know how anyone can say they need the Bisley for the 454 or 480 when they aren't made with any plow handle grips to compare! My 454 is more comfortable with the SBH Hunter plow handle grip frame that I had to add.
When I do the measurements, the Bisley grip is .177" (almost 3/16") closer to the trigger guard than the standard XR3-RED size (aluminum and steel), and the SBH Dragoon/SBH Hunter grip frames which have the most space. Because the larger Bisley trigger guard is also closer to the grip frame, giving the Bisley the absolute least space of any Ruger grip frame. Even closer than the old 'knuckle busting' XR3 size plow handle grip frame! The XR3-RED size and the SBH plow handle grip frames with more distance behind the trigger guard, have the benefit of less chance of rapping the knuckle under recoil.
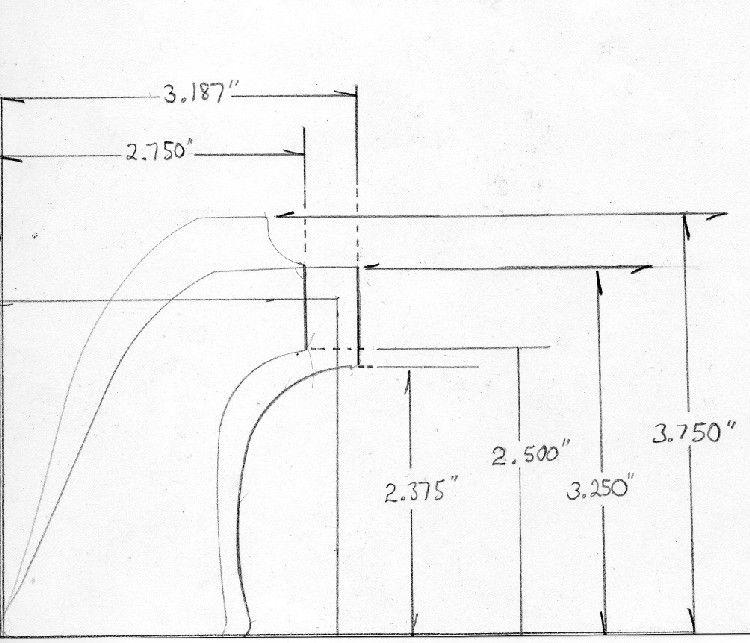
See Cary's sketch below for a comparison:
There's an increased difference (~3/16") in horizontal finger distance behind the trigger guard on the Hunter (and standard XR3-RED size Gripframe), compared to the Bisley grip with less space. The Hunter and Bisley GFs I've measured are actually very close in vertical forestrap length space for fingers to the butt. The Bisley is longer on the backstrap which I think is why some may prefer it, but it also restricts 'roll up' to dissipate recoil:
David Clements - Clements Custom Guns
276-238-8761
2766 Mt. Zion Rd.
Woodlawn, VA 24381
[email protected]
http://www.clementscustomguns.com/
Cylinder and Slide
245 E. 4th Street
Fremont, NE 68025
Phone: (402) 721-4277
Fax: (402) 721-0263
Orders Only: (800) 448-1713
http://www.cylinder-slide.com/
Ben Forkin - Forkin Custom Classics
PO Box 444, 205 10th Ave SW
White Sulphur Springs, MT 59645
406-547-2344
mailto:
[email protected]
John Gallagher - Gallagher Firearms Inc.
(205)384-5229
3923 Bird Farm Road
Jasper, Alabama 35503
[email protected]
http://www.gallagherfirearms.com
Alan Harton (Colt SAAs also)
713-772-8314 or 713-907-6031
[email protected]
Sharpstown, Texas, West S/W of Houston
Makes a .327 Fed Mag Bearcat; http://www.gunblast.com/Harton-327Bearcat.htm
Andy Horvath - DIAGONAL ROAD GUN SHOP
14131 Diagonal Rd.
La Grange, OH 44050
(440) 458-4369, (440) 355-5618
Jack Huntington
JRH Advanced Gunsmithing
775-355-6898
385 Freeport Blvd, Suite 13
Sparks, NV 89431
mailto:
[email protected]
http://www.jrhgunmaker.com/
His turnaround time is short, his work is first rate, and his prices are reasonable.
Dustin Linebaugh - Dustin Linebaugh Custom Conversions
PO Box 263
Cody WY 82414
mailto:
[email protected]
http://www.dustinlinebaugh.com/index.htm
John Linebaugh - Linebaugh Custom Sixguns
Phone: 307-645-3332
P.O. Box 455
Cody, WY 82414
Delivery (UPS):
177 Louis L'Amour Lane
Powell, WY 82435
http://www.customsixguns.com/index.htm
Long Hunter
Amarillo, TX
http://www.longhunt.com/web/
Sounds like a nice package for $135.
Taper cylinder and ejector rod housing $45.00 USD
http://www.longhunt.com/web/index.php?page=models-ruger-vaquero-blackhawk-bisley
Garry Reeder - Garry Reeder Custom Guns
The Pistol Parlor
2601 E. 7th Ave.
Flagstaff, AZ
928-527-4100 / 928-526-3313
mailto:
[email protected]
http://www.reedercustomguns.com/index.html
Factory Videos: Good New Model Ruger disassembly:
http://www.youtube.com/watch?v=UfOXBa8K8Ow
NM Reassembly (shows hammer plunger assembly too):
http://www.youtube.com/watch?v=3zEKDqwkgEs&feature=related