Converted Old Models

Help Support Ruger Forum:

KLNC

Single-Sixer
Joined
Apr 17, 2012
Messages
180
Location
North Carolina
I've had mostly NMs, and an OM or two over the years, but have never even handled a converted OM. What are they like? How are the actions? Worth acquiring if the price is right? I know they don't get much love, but am curious about how they feel and function--just like a new model or different? Does anyone find them to their liking?
 
Joined
Oct 24, 2007
Messages
11,674
Location
Kentucky
The few I've handled did not have actions as smooth as the non-converted ones, but that's a tiny sampling, for sure.

Personally, I prefer non-converted ones and usually deduct about $100 from the asking price for a converted one to allow for the purchase of replacement original parts.

That said, if you are not concerned about "originality" and you find one with a decent action "feel" they're still a Ruger and will likely serve you well.

As you said, "if the price is right . . ."

:)
 

DGW1949

Hunter
Joined
Apr 10, 2005
Messages
3,920
Location
Texas
Two different animals.
The "converted" Old Model action is different from, uses different parts than, and operates differently than the New Model action.

Some folks like 'em, some folks don't.
If it turns out that you don't, it's relatively easy to "unconvert" an Old Model back to it's original configuration.
On the other hand, the parts which are needed usually run somewhere between $75-$250 depending on the condition of the parts being offered for sale, which model they are for, and how "correct" one might want one of the "more rare" variations to be.

Worth acquiring if the price is right?.....the answer to that could be yes, no, or maybe...either of which depends on the exact details involved, whether or not it turns out that you like the gun as-is, and/or how you choose to proceed if you don't.

Hope this helped.

DGW
 

Bob Wright

Hawkeye
Joined
Jun 24, 2004
Messages
7,731
Location
Memphis, TN USA
I have had three OM converted to the transfer bar actions. One of these was a Super Blackhawk that I had returned to the factory, and two .357 Magnum Blackhawks that I bought from an individual. All of these had a very "gritty" and stiff trigger pull, along with a "ratchety-clackety" sound as the action was cycled. And the Super Blackhawk had the propensity of skipping a chamber if cocked rapidly. I put them all back to the original configuration.

However, Hamilton Bowen says he can slick up these conversions into very good actions, as good as any Single Action.

But I still prefer the ond three-screw action, or even a New Model action.

Bob Wright
 

Hondo44

Hawkeye
Joined
Apr 3, 2009
Messages
8,051
Location
People's Republik of California
When just objectively comparing the old model retrofit transfer bar action and the new model action, the bottom line is:

1. Both new, old, and even old converted actions have equal potential for tuning into equally smooth actions with excellent trigger pulls.

2. The OM retrofit actions use different parts than New Models (except the Bearcats which are the same), have rough actions and hard trigger pulls when installed, and although reliable with good longevity, they are of the Colt single action design, specifically the hammer cam and cyl bolt. Except the hammer cam is not replaceable. Therefore a new hammer is required if worn.

3. Retrofitted OMs still require the hammer to be placed on half cock for loading/unloading, maintain the traditional 3 hammer clicks, (actually four), and therefore the chambers properly align with the loading gate trough.

4. The NM transfer bar action is a new design engineered into the gun, with all Ruger engineered style action parts: no flat springs, hammer cams, etc. There's only two clicks when cocking the hammer instead of the traditional 3 clicks.

5. NMs do not require the hammer to be placed in half cock to load/unload, opening the loading gate frees the cyl to spin. And therefore chambers do not align with loading gate at the click of the cyl pawl. The exception is the New Vaquero and NM Flat Top Blackhawks that incorporate a chamber alignment feature since 2005 called the Reverse Indexing Pawl System which is a great convenience for loading/unloading similar to OMs. Most like the standard wide trigger of all the NMs.

There are many individual emotional feelings about the OM vs. NM transfer bar systems and 'big brother' safeties, and all very valid, but also subjective.

I hope this is helpful,
 

mcb66

Bearcat
Joined
Jan 7, 2015
Messages
83
I had an original OM 45 convertible converted. Contrary to my other OM's, the original action was awful. It's a truck gun; not a safe queen, so I sent it back for service. It came back with an excellent action. It is as good as, if not better than any of my other OM's. Plus, I got all the original parts back. I think it is the luck of the draw.
 

Cholo

Moderator
Staff member
Moderator
Joined
Dec 30, 2008
Messages
8,249
Location
Georgia
I don't have, nor have I ever shot, a Ruger that had been converted. Many say that the converted action is worse than a new model. I have far more old models than new, but my NM's have triggers every bit as good as my OM's. Yup, that luck of the draw :mrgreen:
 

eveled

Hawkeye
Joined
Apr 3, 2012
Messages
5,610
Good post Hondo. Thanks. I have examples of old and new, and my favorite to shoot is my new model flat top.

It has the good from the old mixed W/ the good from the new. You can carry with 6, you don't have to mess with the hammer to load, but it still indexes. Plus it has the good looks of the flattop.
 

Hondo44

Hawkeye
Joined
Apr 3, 2009
Messages
8,051
Location
People's Republik of California
Bob Wright said:
Has any of the custom 'smiths been able to overcome the hideous hammer?

Bob Wright

No.
But that brings to mind the possibility of converting a New Model to an Old Model question which has been asked several times. So I've had a lot of fun doing the following:

NM blue or stainless original large frame Vaqueros and New Vaqueros, and NM Blackhawks can be made into OMs in two ways, each with some options. (No OM retrofit transfer bar parts are used in either option.)

A. Easiest is a semi-conversion from MN to OM which is less authentic (with or w/o transfer bar safety):


1. Install a Power Custom 1/2 cock Montado, standard or Bisley hammer. If you want the extra safety notch 'click', a step in the hammer base above the 1/2 cock notch can be added for four classic clicks.

2. Remove or retain the transfer bar. If retained, the cyl latch and loading gate are modified and disengaged from it to load and unload in the OM way by ½ cocking the hammer.


B. Most authentic conversion from a NM to 3 screw Old Model, with four hammer 'clicks' (also with or w/o transfer bar safety), and with the transfer bar, there is no interaction with the loading gate or the cyl latch. Loading/unloading is strictly the OM way by ½ cocking the hammer. I can supply step by step details with parts list if anyone is interested.
 

BoggusDeal

Bearcat
Joined
Apr 7, 2016
Messages
40
Hondo44 said:
B. Most authentic conversion from a NM to 3 screw Old Model, with four hammer 'clicks' (also with or w/o transfer bar safety), and with the transfer bar, there is no interaction with the loading gate or the cyl latch. Loading/unloading is strictly the OM way by ½ cocking the hammer. I can supply step by step details with parts list if anyone is interested.


Hondo44, I am interested in hearing about this conversion.
Thanks in advance!
 

Hondo44

Hawkeye
Joined
Apr 3, 2009
Messages
8,051
Location
People's Republik of California
B. Most authentic conversion from a NM to 3 screw Old Model, with four hammer 'clicks' (also with or w/o transfer bar safety), but with the transfer bar there is no interaction with the loading gate or the cyl latch. Loading/unloading is strictly the OM way by ½ cocking the hammer. Therefore chambers always align properly with the loading gate trough.

Here it is step by step:

You'll need the following OM action parts or optional parts: hammer (Ruger or Power Custom's 3 screw hammer replacement) or one of those mentioned below under hammer options*, cyl latch, latch spring, Colt 3rd generation hammer screw .220" x 28. Note: A disassembled old model for reference and measurements is a must.
Note: on stainless conversions: Every internal part won't be stainless; the OM parts, such as the cyl bolt, loading gate detent screw and plunger, trigger return plunger and possibly hammer depending on the option chosen above. But all the springs will be 'cause they always were.


TO START: Gut all internal parts from a NM SA and put them aside except the trigger, cylinder pawl and cylinder base pin.

*Hammer options:
1. A carbon steel OM hammer with a polished or brushed finish (to look like stainless) or Powers Custom 3 screw OM hammer replacement (not stainless either). Hammer nose modification needed on both if the transfer bar safety is retained.

2. Powers Custom stainless half cock NM Montado/Super hammer. Hammer nose modification needed if transfer bar safety is NOT retained. The safety notch is useless anyway but a small shelf can be added at the right location for the "click". Enlarge hammer pin hole in base to fit the OM screw.

Tap hammer pin hole in left side frame to .220" x 24 threads and enlarge hammer pin hole in right side frame for clearance and counter bore for the hammer cap screw.

Trigger options:
The NM trigger/cyl bolt pin hole in frame does not align with either of the OM trigger or bolt screw holes. The trigger/cyl bolt pin hole must be tapped on left frame side and counter-bored on right side for the cap of a machine screw* to use with the NM trigger.

NM trigger is modified by grinding the spring perch web off the back for use with an OM return spring and plunger an Old Army stainless grip frame, (note: it's an XR3-RED size). Any NM grip frame can be used with its standard trigger return spring by not grinding off the trigger spring perch web. Or by making the well known adapter** and OM spring and plunger for the true OM look.

Also cut off the transfer bar boss (unless transfer bar is retained. Then the lower right side of the OM hammer will need to be relieved to match the relief cut in the NM hammer.)

The NM trigger stop at the top area must be removed for clearance of the added OM cyl bolt screw.

And the NM trigger sear must be thinned to fit the OM hammer notches or the Power Custom ½ cock hammer, exactly like the Power Custom trigger they supply for their ½ cock hammer or buy the NM Power Custom trigger with already modified trigger sear.

Trigger return spring options:
1. OM trigger plunger/spring with a trigger spring adapter to use the existing NM grip frame.
2. replace grip frame with Ruger Old Army Stainless 'KXR-3' with wide trigger slot and provision for trigger return spring/plunger.
3. Retain NM trigger spring.

To be completely authentic by using an OM narrow (there's no steel OM grip frames with narrow trigger slot) or SBH wide trigger:
The trigger/cyl bolt pin hole must be plugged with two oversize pins, 'peen blended' and polished over flat. Then a new 8 x36 trigger screw hole drilled and tapped*.

Cylinder bolt:
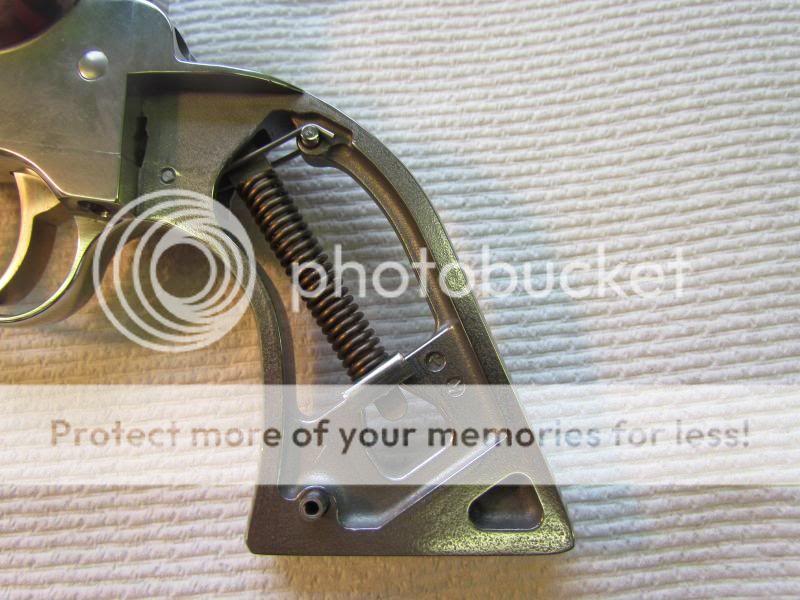
Locate, drill, counter-bore and thread 8-36* a new cyl bolt screw hole in the old model location. Use an old model cylinder latch (stop bolt) and return spring. Drill small hole inside frame to capture end of the above return spring.

Loading gate:
Use OM gate and polish bright for a SS gun. Or existing NM loading gate can be modified to the OM gate style with two flats for the open and closed detents. Grind off the half round protrusion at the back end of gate shaft to disengage from transfer bar if the bar is retained. In either case, drill and tap hole in the bottom of the frame for an old model style gate plunger, spring and set screw.

Cylinder base pin:
You can use the SS cyl pin with the plunger in the end or remove plunger. Or use OM carbon steel pin polished bright.

* Details for the action screws:

Hammer screw option - Make a fake screw/hammer pin, from a large enough screw to remove threads and end up with a shank the size of the pin .202" and a slotted cap the size of the OM hammer screw cap.

Trigger screw – the existing NM trigger pin hole is perfectly sized to tap on left frame side for a stainless 8x36 machine screw which you can buy. Slight dressing down of the threads will allow it to fit thru the NM trigger hole.
Cyl Bolt screw – same as Use the factory OM screw. Drill and thread hole 8x36 for it.

Turn down the 8x36 screw caps of the trigger and cyl bolt screws a little smaller than the two original OM 8x36 screws and they won't look too close together at first glance. Drill the right side frame holes to fit the screw caps.

Locating and Drilling 3rd screw hole in frame:
I measured with the screws in the holes and the screw slots perpendicular to my line of measurement. It's easier to judge the center of the hole that way, as long as the screw slot is cut in the center of the screw cap!

The cyl latch screw hole ctr is .877" from the ctr of the hammer screw hole. And it's .185" from the ctr of the cyl latch screw to the bottom of the cyl window. Scribe a line for each measurement and center punch where they cross for the ctr of the new hole to be drilled. I always start a precise hole with a 1/16" center drill to enlarge the punch dot. Then follow with a little larger pilot drill all the way thru the work. Then the final tap size hole. I use 'gun taps' (2 flutes). The trickiest part is clamping the tapered frame so the hole goes thru at a right angle to the frame ctr line.

**You can make the simple aluminum adapter below to fit in the NM GF behind the old model trigger or just use a .22 LR case to hold the return spring and plunger in place. Either will need the one NM trigger return spring retaining pin closest to the trigger shown below 2nd photo, to hold your OM trigger return spring/plunger adapter or .22 case in place. File a small notch in the .22 case head to nest on the retaining pin.
orig.jpg

IMG_1399_zps09554883.jpg
 
Top