Earlier New Vaqueros and Flat Tops have blued hammers and triggers. I would advertise for them in the classifieds of this forum. Many have replaced them with Bisley and SBH hammers.
Reason for poor fit of some hammer bases to grip frame ears:
The single seven hammers match because they are new castings like the New Vaquero and NM flat top hammers.
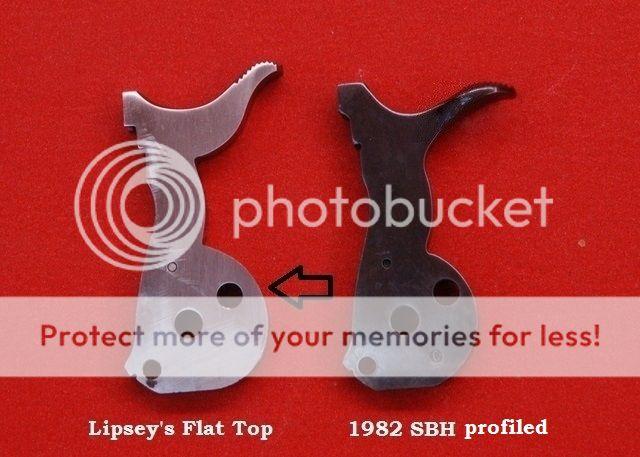
HAMMER BASE SIZES: Ruger has only enlarged the base of the hammer to match the taller grip frame ears on the newly designed hammers introduced 2005 such as the New Vaq standard 'long horn' and Montado hammers, and the NM Flat Top Blackhawk hammers. All other hammers designed prior to 2005 on current model guns are small base and do not match the post 1998 tall eared grip frames (See grip frame ear changes below). If I install a small base hammer, I fit the grip frame ears to the hammer. I have to do this every time I install a newer grip frame such as the N Vaq and Flat Top XR3 style steel grip frames or newer XRE-RED steel grip frames on older New Models and Old Model Rugers.
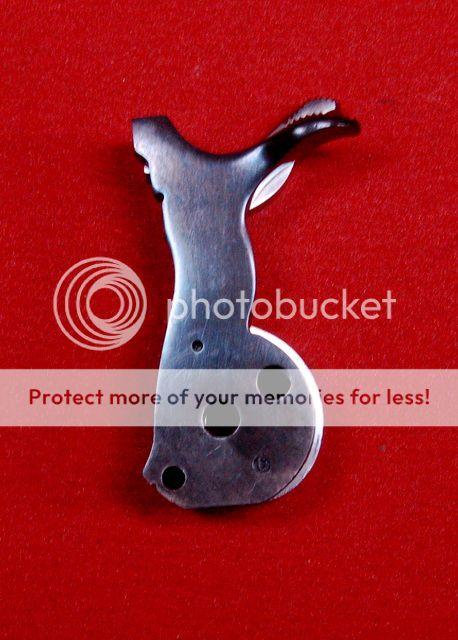
Right hand hammer is after c. 2005 up to current production with large base 1.122" – 1.130" (Flat Top and New Vaquero only).
Mike Campbell photo.
The top small base hammer 1.071" – 1.076" predates the c. 2005 large base new hammer designs. Measured on the centerline of the two large holes from back of hammer base to over the full cock notch.
The hammer underneath is a new Flat Top Blackhawk with large base 1.122" – 1.130" and narrow shank.
Mike Campbell photo.
GRIP FRAME EAR CHANGES to be aware of: the ear height around the base of the hammer varies on all grip frame ears slightly due to hand fitting at the factory, but there was one specific big increase. To simplify production in about 1997, Ruger increased the height of the standard cylinder frame mating surfaces on both sides of the hammer 1/16" to match the Bisley model frame ears so any style grip frame could be assembled to any main frame. Therefore the ears on all other grip frames after 1997 had to be made 1/16" taller as well. So there's basically two sizes: as short as .530" pre 1997 and as tall as .590" after 1997 (for example: Original Vaqueros over serial range 56-XXXXX). Measure from the very top edge of the grip panel to the top of the ears. That's why swaps are simplified if any acquired grip frame matches the vintage of your Ruger that you want to put it on.
The grip frame 'ears':
My SHORTCUT FOR REMOVING JUST HAMMER and/or PAWL:
Recognize, you do not need to hassle with the PESKY LOADING GATE SPRING, pull the trigger pin, OR trigger/transfer bar JUST to remove the hammer and pawl. Once you remove the grip frame, the hammer pin is the only other part you need to remove. After that, just pull the hammer back and all the way down, then depress the hammer plunger in the base of the hammer with a small tipped screwdriver to clear the trigger extension where the transfer bar connects to it. Let the hammer & pawl fall out. Install in reverse! Piece o' cake.
NOTE: While you have the grip frame off, it's always good to examine the upper end of all the grip frame blind screw holes for thread shavings that weren't cleaned out from the factory and get crammed in there by the screws.
Also check the two trigger guard screw holes where they are exposed by the milling cut if your grip frame has the two projections that go into the main frame (the New Vaquero and New FT BH guns no longer have these projections and milling cuts). Almost always there will be a huge flat 'roll-over' burr in each hole from the milling cuts that expose the holes. If they are present they generally cause the 1st 1/8" of removing those two screws to take extra effort to unscrew. You'll need to break off the burrs and pick them out with a dental pick or equivalent tool.
TIPS FOR INSTALLING GRIP FRAMES:
Install all five screws but do not cinch them tight. Align the grip frame edges flush with the cyl frame by tapping with the butt of a plastic handled screw driver. Tighten one trigger guard screw, then front screw and then one ear screw. Then tighten them all. Check for ease of hammer movement to be sure it's not rubbing on grip frame ears.
AFTER CHANGING HAMMERS in New Model Rugers, the first thing to check is the transfer bar clearance with hammer for reliable firing pin function.
TO TEST HAMMER/TRANSFER BAR FOR MISS-FIRES:
With hammer fully cocked, press on the transfer bar to extend the firing pin and observe how far thru the recoil shield it protrudes. Now keep the trigger pulled back, drop the hammer and observe the firing pin again. If firing pin protrudes the same amount, you're good to go. If it doesn't protrude the same amount, you need to remove just enough metal from the top face of the hammer nose so the transfer bar is pushed tight against the firing pin and the frame. If you remove too much, the transfer bar will not perform its safety function and will be pinched. Also make sure hammer has no friction or contact with grip frame ears around its base to slow its fall and you may have miss-fires; another potential issue when making hammer changes.
IF TRIGGER DOESN"T RETURN, SAFETY IS NOT WORKING:
If the transfer bar is hanging up under the hammer face, since it's connected to the trigger, it prevents the trigger from returning. The transfer bar is slightly too thick. If both ends of the trigger return spring are connected (under the grips), or even if you have only one leg of the spring connected it should pull down the transfer bar if it's the correct thickness. When this happens, the transfer bar safety function will not work. If the gun were dropped, and a live round in the chamber under the hammer will fire.
This is not uncommon however, and it's a very simple fix. File the second step of the hammer face, counting from the top, just a bit until the bar no longer hangs up. Don't take too much off or you'll have miss-fires. If that happens file a little more off the top step of the hammer.